
- You are here:
- Home »
- Goalkeeping
Category Archives for Goalkeeping

Top Down and Down Up Save Progression
By Mike Smith –
Try this simple training progression to help improve your keeper’s quickness and reaction time, I call it Top Down / Down Up. How often do we shoot on the keeper, allowing them to make one save and then giving them recovery time – regardless of what happens with the ball after the save? Only in a pk shootout can a ball which is denied by the keeper into the field of play be allowed to simply stop without being sent back in. If the keeper does not adequately clear or smother the ball, they are going to have to make another save, sometimes almost immediately and this is actually something they can train for. Check this out:
Set Up
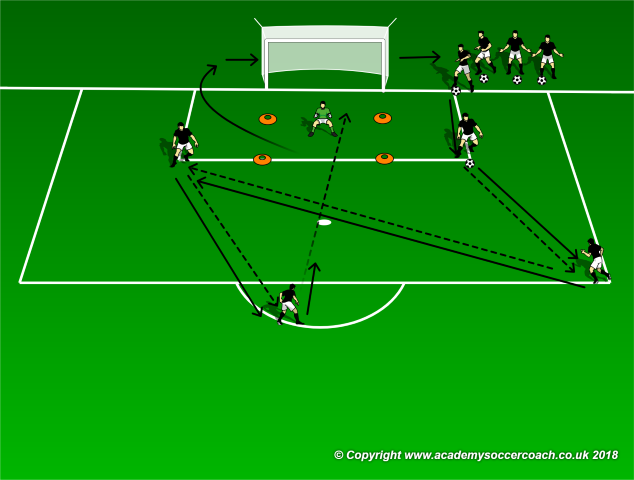
Let two keepers work together between two goal sized ( 24 ft ) cones. The keeper throwing the balls will need a good supply as the progression happens quickly. First, start by throwing a high ball, AS SOON AS the saving keeper makes contact with the ball, the serving keeper shuffles left and throws a ball between the chest and knees. AS SOON AS the saving keeper makes contact with the ball, the serving keeper sends a ball in on the ground, forcing the saving keeper to go to ground for the touch as well.
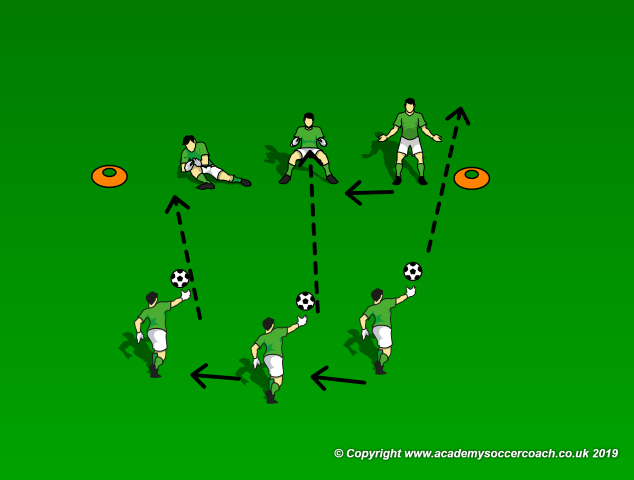
As soon as the touch is made on the ground, run the progression back to the other side ( as shown below ).
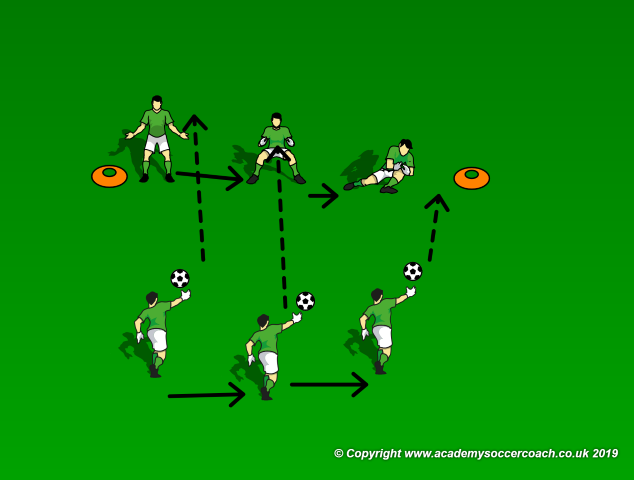
The speed of the distribution can be increased and each keeper should do 5-7 reps in a row before switching between saving and distribution roles. Once the keepers have it down, put them in front of the net.
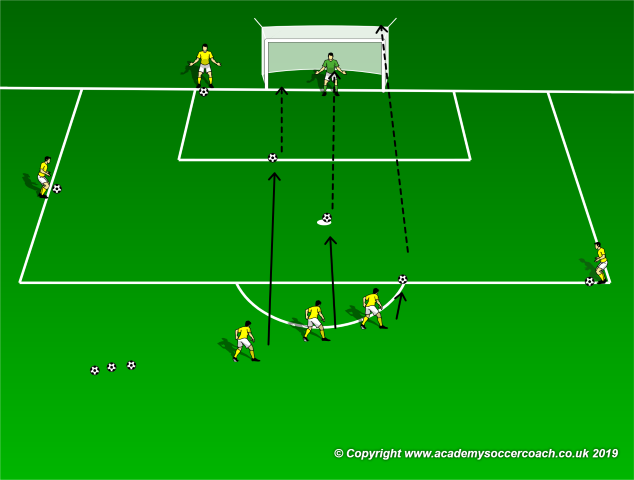
Shooters come in groups of 3, one group ready to shoot and another ready to set up as soon as the shots are taken. As shown above, balls are placed on the top of the 18, the pk spot and the six. Shooters go almost simultaneously with the shot from the top of the 18 going high, the pk spot going mid range and the shot from the 6 on the ground. Additional groups of 3 can shag balls and this drill can move rather quickly with 9-12 shooters and 2 or even 3 keepers.
Coaching Points
While a great shooting activity, the focus is on the keepers making several save attempts at different areas very quickly. Many keepers will be able to actually save the shots but the focus is quickness, just getting up and down and moving side to side rapidly, the actual saves are a bonus. After the keepers start getting their hands on most of the shots, allow the shooters to change where they shots are going without letting the keepers know a head of time.
By Mike Smith
Currently the Head Coach for University Heights Academy Boys Soccer in Hopkinsville, KY , Mike is in his 14th year as a high school head coach with 23 years coaching experience overall and 34 year as a student and fan of the game. He holds a USSF D License.

Study the Shooters
By Mike Smith –
I am a firm believer in the ideals of probability, muscle memory and geometry. I think all of these are key aspects of good fundamental keeper training. However, at some point, a keeper has to be able to rely on their own unique abilities – just like a natural goal scorer – to set themselves apart from the pack and truly master their craft. As coaches we all readily identify those young players who have a natural talent for making circus saves, and then drill the fundamental aspects into them as well. For me, something I always find missing, which we can all start doing with our keepers much earlier in training, is the idea of “ making a read”.
A large part of making good reads involves studying the opponent- especially the shooters. Let me explain it another way : Attacker is coming up the right side and cuts in towards goal just off frame for the shot. The keeper should step out off the near post, cut down the angle and force the shooter to come across their body with their right foot, hoping for an in swinger to get the ball to bend into the far side netting: all while playing to the keepers stronger right hand – advantage keeper. Unless the striker coming up the right side is left footed. This is where we need to encourage our keepers to constantly analyze their opponent’s strengths and tendencies as through this study the keepers will be better prepared to make the right read. In the situation above, shocking as it may sound, the keeper might be better off giving the shooter a bit more of the near post than normal. Additional scenarios where a study of an opponent pays off are corners, free kicks, deep shots and tendency to shoot vs pass/cross. For example:
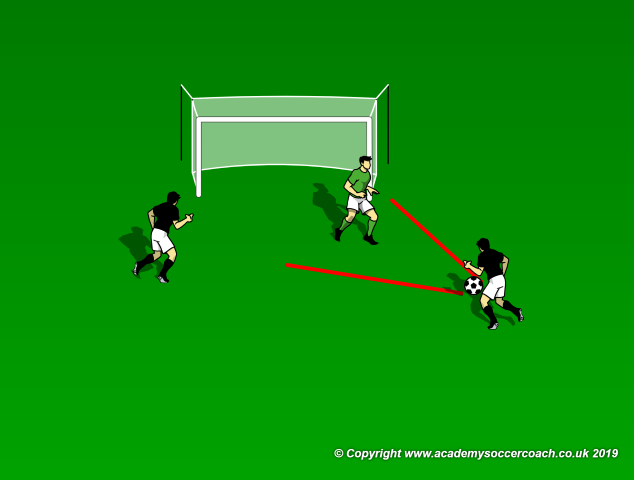
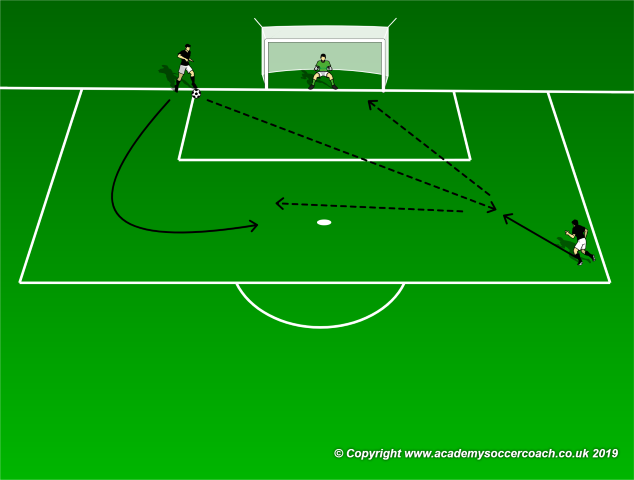
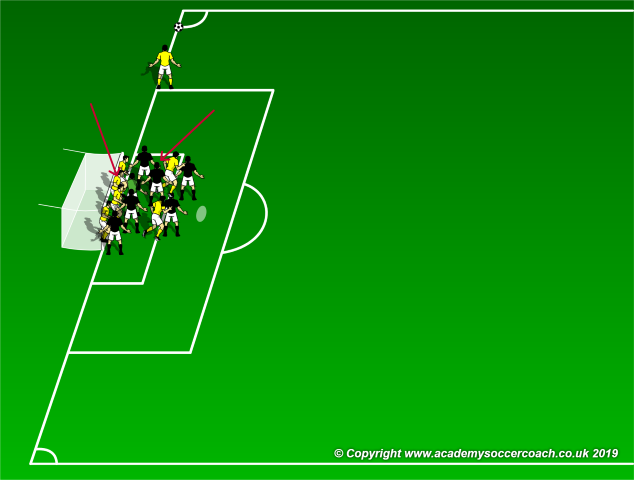
And let me preface ; the idea of letting a keeper make a read is most specifically useful when there are no other options – break aways. Take the scenario above, the red lines represent the approximate area the attacker can use to send the ball towards goal. Cutting off the near post is good, we will say the attacker shoots with their right foot, but what about stepping out? The chance of disrupting a pass here may be better from the keepers current position given the attackers are on a dead sprint, but what about trying to close down the shooter here? What if the goalie knows this attacker has shot the ball 5 previous times, missed all 5, is the leading scorer for the opposing side and is on a 2 game scoring drought? Let the keeper make the read, and more to the point, train them to make the read.
Set Up
As shown below, set up a simple 2 v the goalie shooting drill. While it looks like a lot of space in the diagram, all the activity is taking place from 12 yards in and reflects the space commonly used on a break away. Groups of 2 attackers can take turns running the progression. Play starts with one attacker sending the ball across the box to an oncoming wide attacker. The on coming player receives the ball and may either immediately shoot or pass. IF the pass is made to the player who initially served the ball in, a shot or another pass can be made ( see second diagram below ).

This will put the keeper under some pressure. The idea is for them to make a read, right or wrong, and act. To help, the coach should assign certain shooting groups certain functions, i.e. – one group, even when they switch serving roles shoots immediately from deep. Another group makes one pass and then the shot comes. Another group makes two passes and then another group is free to choose each time. Then the challenge is just working with the keeper on first making a read, then making the right one. Once the keeper has studied the groups – and knows what will happen, the coach can progress the drill and either add attackers, or give the groups a pattern of shooting to follow – first attempt deep shot, second attempt double pass, third attempt deep shot , etc.
Coaching Points
This activity will help your goalies speed of thought and action. Along with this drill, every coach should encourage their keepers to study their opponents, not just during direct games, but during the entire season. In this modern age, the stat monsters get press and this means not just articles, but pictures and video as well. Natural talent, combined with sound fundamentals combined with the freedom and ability to study and read an opponent will help elevate your keepers game “ to the next level”.
By Mike Smith
Currently the Head Coach for University Heights Academy Boys Soccer in Hopkinsville, KY , Mike is in his 14th year as a high school head coach with 23 years coaching experience overall and 34 year as a student and fan of the game. He holds a USSF D License.

Anticipate Blind Shots
By Mike Smith –
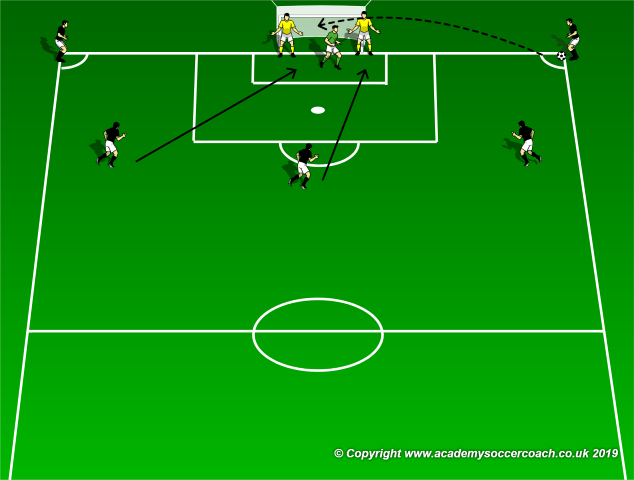
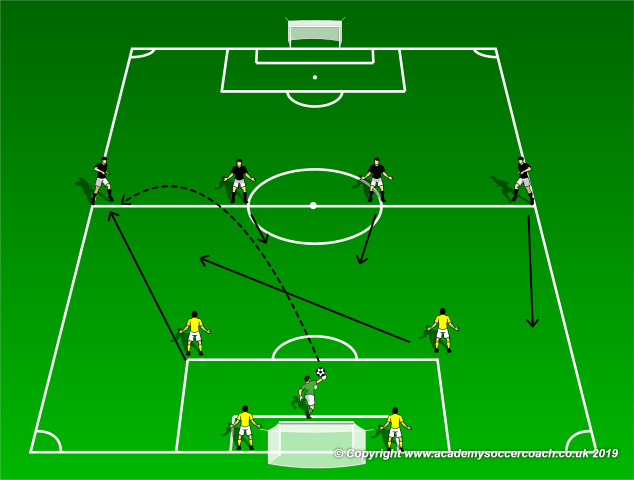
I often times challenge my field players to hit “ blind” crosses to space, anticipating a target player will get there. The searching ball/shot is a staple of every soccer game at every level; however few keepers actually regularly train to save these “ blind” shots during the run of play. I actually instruct my keeper to call out when they are blind or “can’t see” the ball as a cue for the defender to step up pressure: multiple times when coaching younger teams I have witnessed just the opposite – keeper yells “ can’t see” and the defender steps away from the ball allowing the attacker a clean shot. All humor aside, these “blind” situations are part of almost every soccer game – especially on free kicks- thus keepers should regularly practice defending them. Just as the attacker can anticipate the open space to serve or shoot too, the keeper can anticipate the open space and move there to make the save, whether they can actually see the ball or not- here is what I mean.
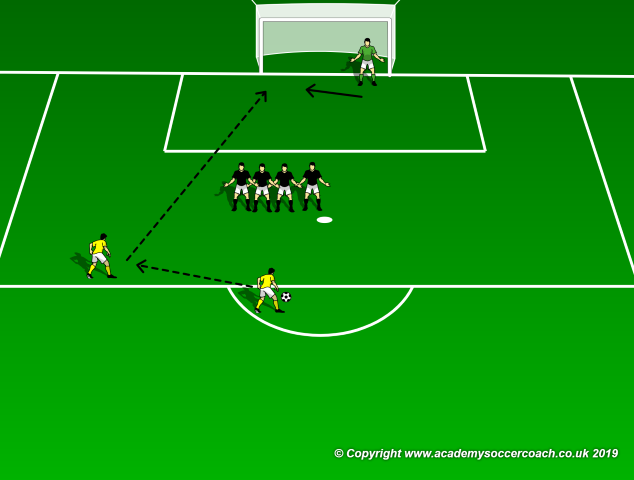
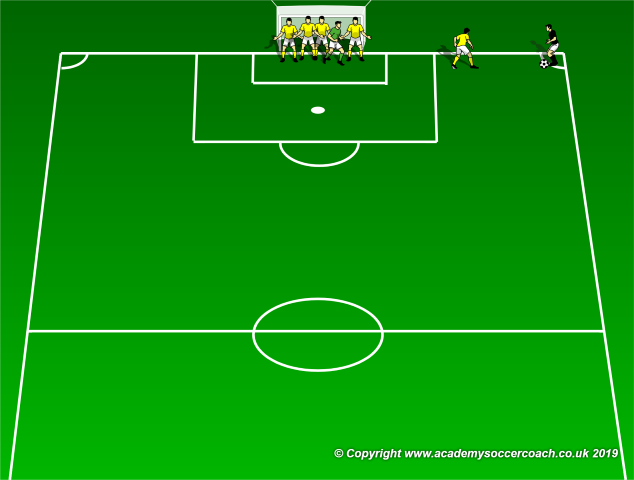
Above is the traditional free kick set up. The keeper sets up the wall to block off part of the goal and then stays in the open space, with a view of the ball, forcing the attacker to make the toughest shot available. However, if the ball is passed off in front of the wall the keeper will be “ blind” for a moment– (shown here on a free kick for demonstration purposes this blind spot is a common occurrence during the run of play). If the attacker receiving the pass shoots first time, the keeper simply has to commit to the blind space on the near post, set up at a good angle in case the strike goes back far post and again, force the shooter into the hardest shot possible. So while most teams practice this scenario for free kicks, too many don’t for similar situations during the run of play, for example:
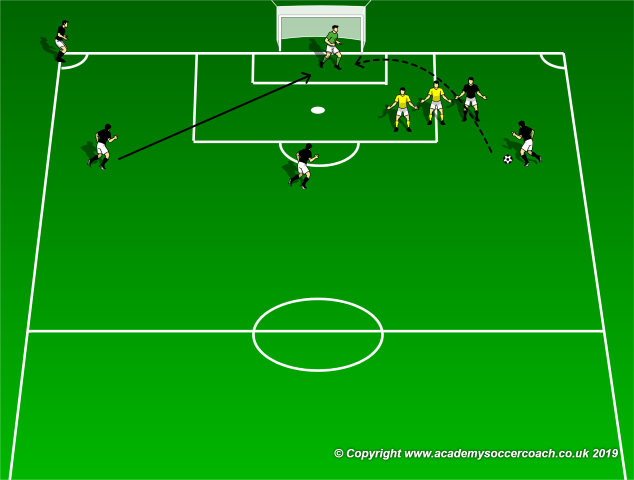
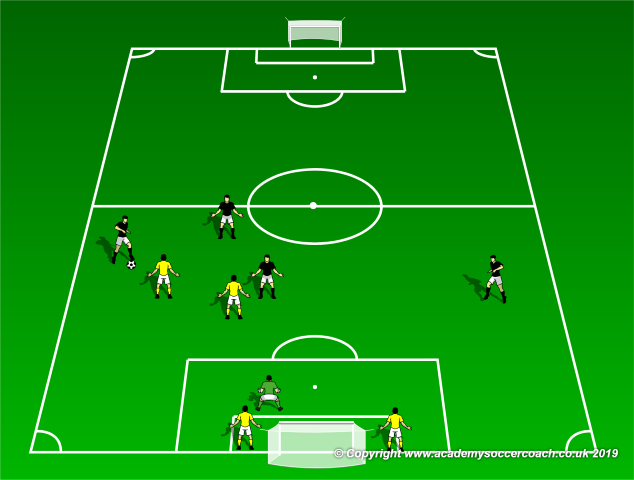
This is a common drill when focusing on attacking and defending – but what about the keeper here? What I see most of the time in this situation is the keeper gets frozen trying to figure out where the ball is going to come from and end up all in short order – and we are talking mere seconds if that – and there is seldom enough time to both think and react. So while I am certainly am an advocate of the “ thinking player” , in this situation I say do the thinking ahead of time and know to react quickly and get to the blind space – which will involve a double move.
Set Up

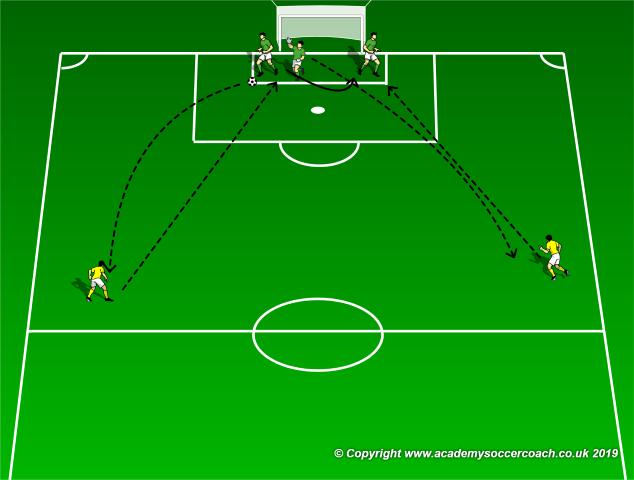
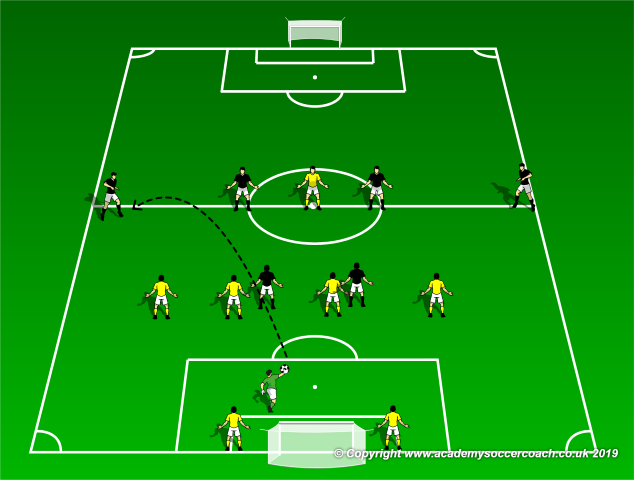
As shown above, just as the path of the ball is going to go across and then back – the keeper’s movements should mirror this and travel with the ball. IF it comes through a blind area, hopefully the keeper will be in position on the way across to make the save by default. As soon as the keeper is set, they should be prepared to move back as the blind area is now on the opposite side. Again, what I am talking about is committing to the pattern of movement which happens MOST of the time – especially at the high school level where attackers are less patient and more excited in front of goal. Instead of asking your keeper to freeze, think and make a read when they cannot see, just ask them to commit to a similar pattern of movement as they anticipate the ball will take. Your keepers can practice it like this:
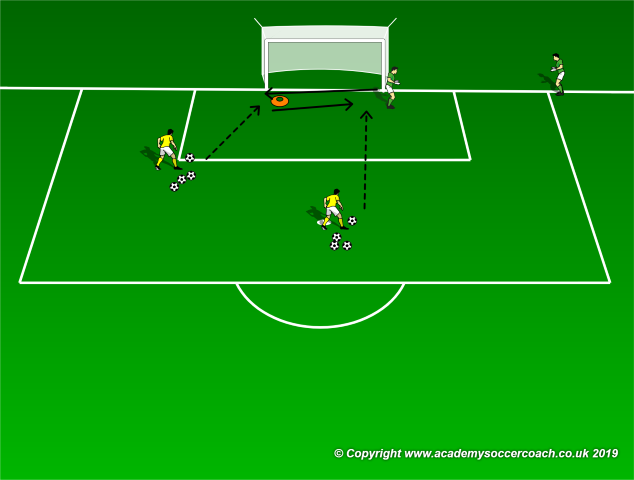
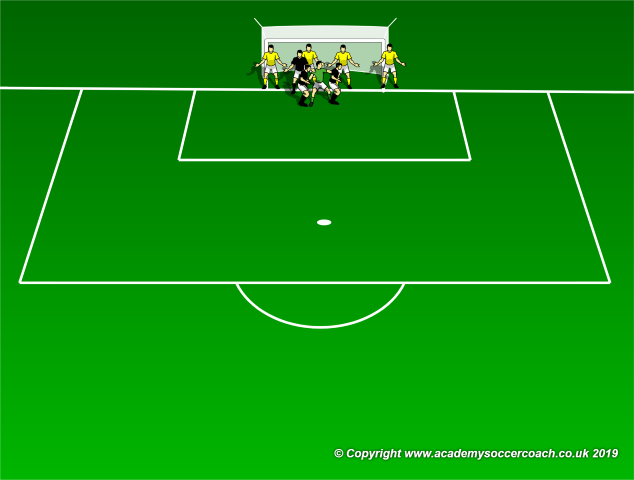
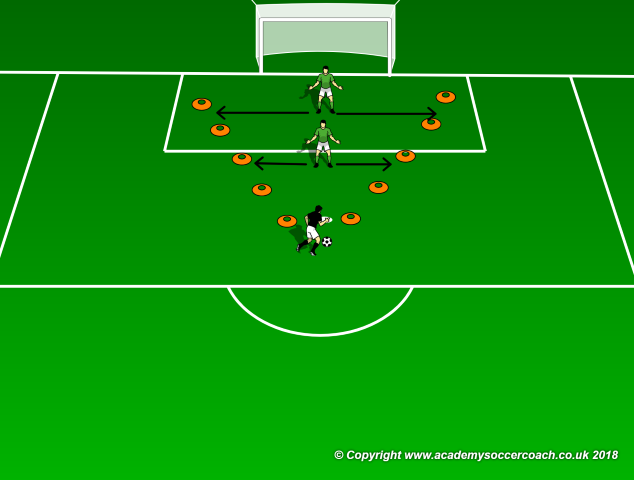
Have one keeper set up in the net as shown above. The other keeper will serve as the starter by yelling “go” for each attempt. When the starter yells “go”, the keeper in the net turns and moves across to the far post – marked with a cone. To start, the striker on the far post waits for 2 seconds after the starter yells “go” and then hits a far post shot. The keeper in the net attempts to make this save however, 2 seconds after the first shot is taken, an additional striker at the penalty spot will hit another shot into the back post. The keeper in the net has to move quickly after the first save to try and make the second save as well. As the drill progresses, the time between shots can be reduced to 1 second and then even more quickly should your keeper master both the 2 and 1 second delays.
Coaching Points
The idea here is for you keeper to commit to a pattern of movement when they cannot see. Obviously, if the keeper is able to see, like when the attacking team attempts to set up again for example, then the keeper can take the time to set up for what they can see, however, the fact remains too many goals are scored on the back post because the keeper, especially young ones, is trying to figure out where the shot is coming from( and going too) when they simply have too little time and too much space to cover. Combine this commitment with a defense which refuses to give up the center of the net and your side will allow fewer goals, but it all starts with the keeper understanding how to make the “blind” saves. Good luck!
By Mike Smith
Currently the Head Coach for University Heights Academy Boys Soccer in Hopkinsville, KY , Mike is in his 14th year as a high school head coach with 23 years coaching experience overall and 34 year as a student and fan of the game. He holds a USSF D License.

Don’t Get Mugged on Corners
By Mike Smith –
Something which is more and more common these days, at least in my neck of the woods, is the instant shielding of the keeper by the attacking team on corners. While for me this tactic skirts the edge of legality sometimes, if done within the boundaries of the laws of the game and combined with an accurate service it can absolutely nullify the keeper’s chances of winning the ball in the air. So what can really be done if this is happening to your keeper? The answer is two-fold and involves the early placement of defenders around the goalie combined with the screening of the actual kick. Here is what I mean:
“It” is almost as simple as shown above, article over. Seriously, usually teams which crash the keeper are placing the ball well. A corner kick is just like any other free kick and can be shielded 10 yds away. I have a team in my region who plans on beating teams by creating corners and making good services to a keeper who is, as I have been calling it “ getting mugged”. Simply placing a player in the vision and line of the service will cause problems. Also, while we all stand players on the near and far post there is nothing stopping us from adding a couple more players into the mix as a “ wall”. I have had success placing two additional players on the line who, when combined with the keeper taking space, can guarantee room to move.
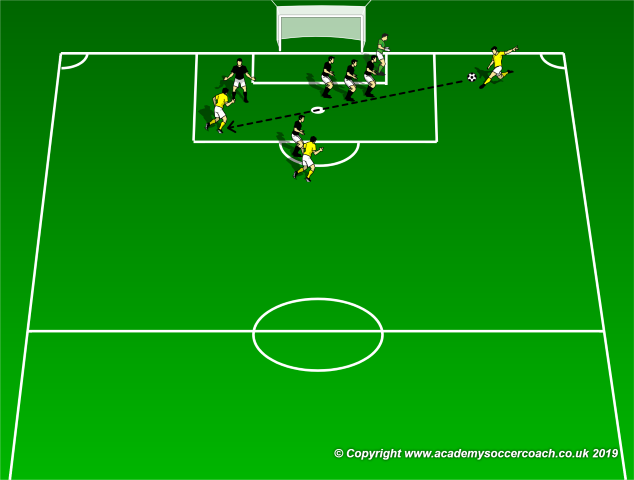
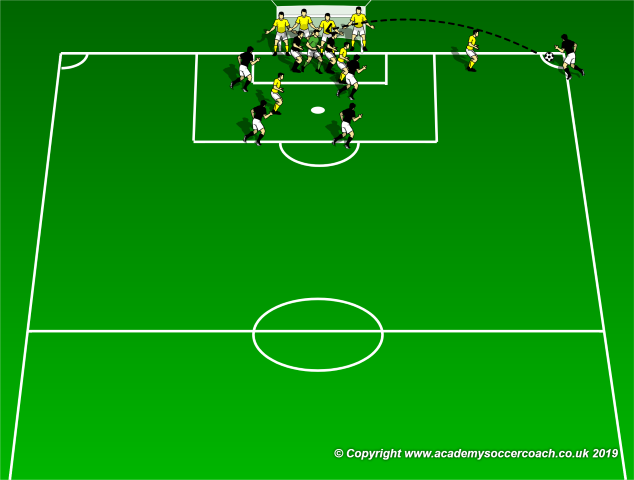
As shown above, even with the keeper fully screened, the extra players on the line can step away and let the keeper in should he/she need the space. Also, while it seems like a nerve racking concept, the extra players on the line are in a better position to come forward and win the ball going away from goal rather than attacking their own net. Additionally, even if the attacking players step right up on the line, with little room to move it will take the most accurate of flicks to do damage, and this depends on the quality of the service, which remember, is being obstructed.
As shown above, even with 6 in the box for the attacking side, there are few marking issues. Note the attacking player ( black ) under the red arrow. IF this is the target player they will want a run in so there will be space. This run in is challenged by the defending player ( yellow ) marked with the red arrow.
Set Up
The best way to see if this is something which can work for your team is to set it up at practice and run it. Your keeper is in charge of the placement of the players and can tell them whether to move, step up or hold their line. Communication and leadership from the keeper is the key to success here. 7 attackers challenge 7 defenders plus the keeper in the penalty box. The only rules are that 4 defenders start on the line, two attackers bracket the goalie and one defender shields the kick. Teams of attackers and defenders, plus additional keepers can rotate in and out after a set number of attempts.
Coaching Points
The coach should be concerned with the communication between the keeper and the extra defenders on the line. I have run this several times over the years and what usually ends up happening is the players bracketing the keeper step away for a better run up as the service is usually an issue because of the obstruction. Once the ball is played, the defender shielding the service can step in, and I have found it additionally useful to have a defender out near the server in case a short, or dummy corner is taken. Even if this isn’t something which you feel will work in the game, it is an excellent keeper communication / leadership activity.
By Mike Smith
Currently the Head Coach for University Heights Academy Boys Soccer in Hopkinsville, KY , Mike is in his 14th year as a high school head coach with 23 years coaching experience overall and 34 year as a student and fan of the game. He holds a USSF D License.

Game Ready GK Warm Up
By Mike Smith –
One of the tell-tale signs of good team is how they warm up their goalies prior to a game. Good teams ( coaches ) understand practice activity and pre game activities are, or at least should be, similar but different animals. Especially in youth sports, practices are a mix of individual skill training, tactical awareness training , teamwork/ gamesmanship and match specific training. During pre-game however, the plan should already be in place, the skill work should be done and the focus is more about being warm and loose and prepared to use the skills needed to win the game.
This is especially true with the keeper. So while I see tons of pre-game “ ground” exercises used as warm ups – (which are fine as the INITIAL warm up)- and tons of pre-game 1 v 1 shooting – what about the rest of it? How many keeper warm ups also include – pks, corner kicks, free kicks ( including working with a wall ), punching vs parrying vs catching, handling services and distributions? Here is a good pre-game warm up which will not only “ train” your keeper, but also get them ready for the match at hand.
Set Up
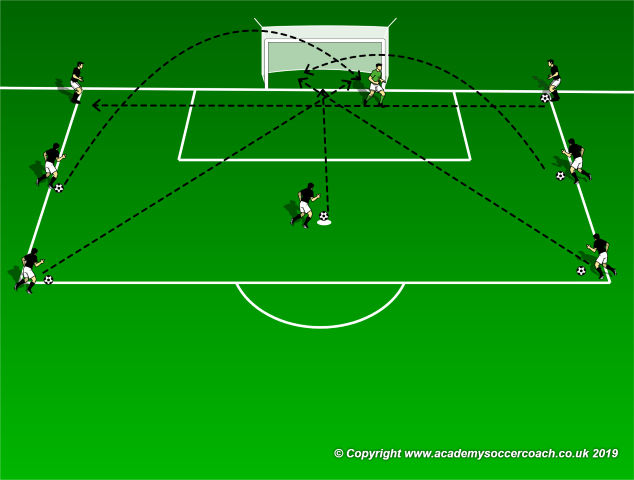
As shown above, this progression helps the keeper deal with many of the common shots they will face during a match. Starting at the top right, have a player – usually one of your “assisters” slide the ball across the goal to the opposite side. The keeper should try to smother this. Working down clockwise, have an intermediate player chip a ball in so the keeper can catch/punch/parry the ball. The shot from the corner of the 18 should be a rocket driven hard to the far post. Next, a penalty is taken and then the progression is continued around the other side continuously progressing from right to left and left to right. In just 15 minutes or so, after the keepers initial stretch and warm up, the keeper can face 5- 10 shots, services and penalties from several common game related angles.
Progression
As shown above work with a corner kick to start the next progression, with a defender on each post and two crashing attackers once the keeper has handled a couple free services.
As shown above have the two defenders and corner attacker step out to make a 3 man wall, which the attacker just outside the corner of the 18 attempts to hit a free kick over ( the finishing attacker shown is optional). For the free kick taken from the center, the 3 man wall moves to the middle and is joined by the attacker who just hit the service to make a 4 man wall.
The progression is then continued around to the other side. Again, 5-10 minutes of this and the keeper will have faced more free kicks and corners than they may in the game. Finally, as shown below, have the keeper make a progression starting with a goal kick. The kick is initially taken out wide to a waiting defender, who the plays it right back for the keeper to scoop up and distribute ( throw or roll ) to another defender waiting on the opposite side. This defender plays the ball back for the keeper to reset for a goal kick, and the progression is made back around to the other side. This is done for 5 to 10 minutes as well.
Coaching Points
Including an initial warm up and stretch, this whole progression will take between 35 and 45 minutes. I usually have my teams arrive at a game 1 hour before match time which leaves an additional 10 – 15 minutes for traditional shooting drills as a final part of the warm up. Feel free to modify this as needed, using as few or as many players ( this is a great position specific warm up for all players) as desired. The main idea is to progress around to include shots from game like situations and this is a simple thing which will go a long way to not only train your keepers, but also make sure they are well ready for the match. For those who also prefer possession work pre-game, different groups can be used with each progression to make sure all the field players have helped warm up the keeper, worked on some match specific scenarios and gotten in plenty of passing and possession.
By Mike Smith
Currently the Head Coach for University Heights Academy Boys Soccer in Hopkinsville, KY , Mike is in his 14th year as a high school head coach with 23 years coaching experience overall and 34 year as a student and fan of the game. He holds a USSF D License.

Practice Communication
By Mike Smith –
I say it all the time, hear it said all the time and even study it quite a bit- yet few of us actually practice it – communication. While good communication is a foundation of success on the field at every level and position, for me it all starts with the keeper. For whatever reason, a vocal forward , midfielder or defender doesn’t always equate to a vocal team but almost always, a vocal keeper creates a domino effect and will improve the communication of all the players on your squad. Perhaps it is because the keeper can easily see and communicate with every one? Regardless of the “whys” practicing communication with your keeper will pay dividends both for them and your entire group.
Set Up
Play starts with the keeper making a distribution out to 4 attackers ( shown above ) spread across the half line ( a cone line can be placed across the top of the defensive third as a starting mark for younger groups ). The keeper always makes the distribution wide to start. Two defenders step to provide pressure and cover, as shown below.
It is now the keeper’s responsibility to tell the two remaining defenders ( waiting on the post ) where to go. Does one double the ball and the other provide balance in the center? Does one provide balance in the center and the other one pick up the wide attacker? This is all up to the coach and keeper but regardless of the plan or style of play, the keeper must instruct the defenders. The coach can set a time for the attacking groups of 4 to possess or create a shot ( 10 seconds per group for example) and groups of defenders and attackers may rotate in and out. Any defensive win or clear restarts play with a new group.
Progression
As shown below, the drill can progress to 6 v 7 by allowing 2 attackers to start as forwards with their backs to goal marked by a line of 4 defenders. An additional defender is placed on the half line with the two final defenders waiting on the posts for the distribution to be made. The idea here is for the keeper to instruct the defender on the half line to either drop in, cover wide, or pressure the ball. Once the wide attacker has the ball, the defenders on the posts may enter play with or without specific instructions from the goalie.
Additional defenders and attackers can be added to make this a half field scrimmage as a final progression, scoring rules for the defense ( possession, clearance out, advancing over the half line ) are up to the coach.
Coaching Points
The coach should work with the keeper on being vocal with the defenders and the pressuring midfielder. As the drill progresses, all the defensive players should be in constant communication based on the keepers initial instructions.
By Mike Smith
Currently the Head Coach for University Heights Academy Boys Soccer in Hopkinsville, KY , Mike is in his 14th year as a high school head coach with 23 years coaching experience overall and 34 year as a student and fan of the game. He holds a USSF D License.

Get Off the Line
By Mike Smith –
Over the course of my 24 years of coaching in general and 16 years of coaching high school, one of the constants I have faced is the need to “make” a keeper. Most coaches have moved around a bit as far as teams and age groups coached, but in all my travels I have only inherited 3 actual keepers. The reason I mention this in an article about getting off the line is that playing keeper is intimidating and already takes a special kind of player. When this player is new or just trying it out to help the team, this intimidation often shows up with the keeper standing on the line. While good line play is a staple of good keeper play, we all know getting stuck there can spell disaster sometimes, so here is what I do the help the keepers “ get off the line”.
First, I explain to them about what I call the “ shooters V “. I set up cones as shown above and explain that this basic V shape pivots with the shooter and most of the time, the ball is going somewhere in this V ( unless the shooter shanks it, whiffs it or skies the bar – all fine from a keepers stand point ). Once keepers understand if they sit back, they have to cover more ground to make the save ( noted by the upper keeper and movement lines ) than if they step up and cut down the angle ( and coverage distance ) a bit ( noted by the lower keeper and movement lines ) they readily move out more. Obviously too close and they risk being burned by fancy footwork so again, most readily understand the benefits of stepping out a bit.
After a good warm up, we do a bit of shooting, with a twist:
Set Up
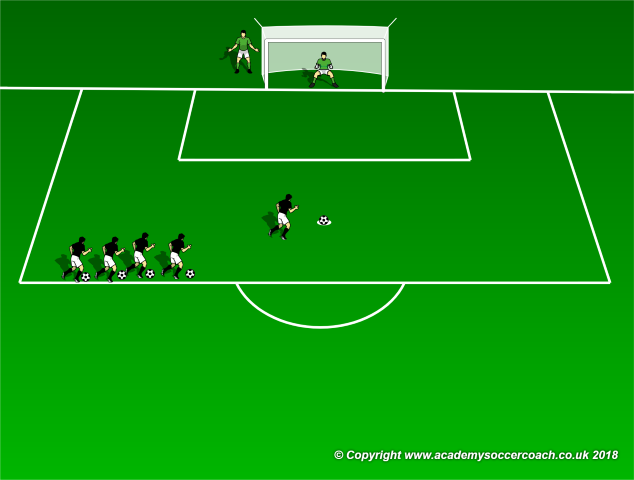
As shown above, cut the keeper box in front of the frame in half and have your keeper ( keepers ) make saves from there. Any shooting progression can be used, I use the one shown above most often as it mixes in short passes, diagonal passes, set up passes and shots from around the pk spot ( the shooter shags the ball so there is a bit of running there too). The numbers of shooters should allow for minimal recovery time as this should progress fairly quickly. Multiple keepers can rotate in after a set number of shots ( 5 – 7 ).
Progression
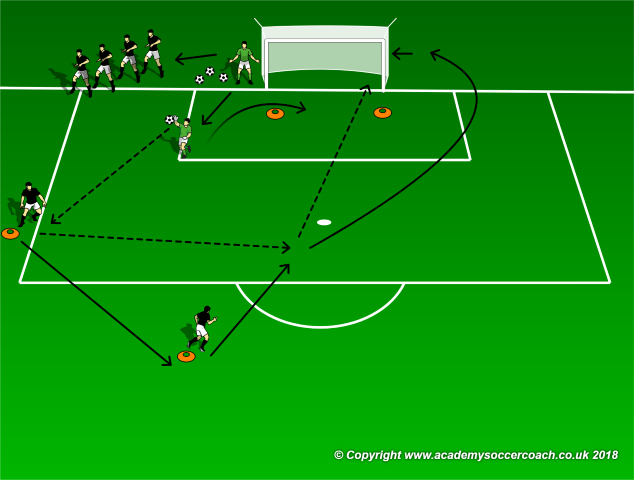
Once the keeper is comfortable operating in the area off the line in front of the goal, remove the top two cones from the keeper box and re-position the shooters as shown below. This drill starts with the keeper distributing the ball from the top of the 6 to an attacker who lays the ball across around the penalty spot. Another attacker rushes in for the shot. The keeper must distribute the ball the sprint behind the cone gate to attempt the save from between the cones. The shots should come in quickly enough to force the save just as the keeper is getting near the cones so attacker starting positions should be adjusted to facilitate this. After a save attempt, the saving keeper either digs the ball out of the net and then drops out, or drops out after a save with the shooting player collecting the ball. The in coming keeper waits until the net is clear to make the next distribution. Shooters rotate as shown.
A final progression would be a half field scrimmage 8 defenders vs 10 attackers to see how the keeper adjusts moving to and from the line.
Coaching Points
During the drills the coach should focus the keeper on cutting down the angles and being ready to make the save. For beginning keepers, just getting a hand on the ball is a win. During the scrimmage, the coach should stay by the goal and give the keeper cues on when to step out and when to hold the line but the overall main idea is to get the keeper comfortable using the right space inside the box at the right time – especially when it is time to “ get off the line”.
By Mike Smith
Currently the Head Coach for University Heights Academy Boys Soccer in Hopkinsville, KY , Mike is in his 14th year as a high school head coach with 23 years coaching experience overall and 34 year as a student and fan of the game. He holds a USSF D License.

Get Better on PKs
By Mike Smith –
There is no higher pressure situation for a keeper to face than that of a PK. Some could argue a 1 v 1 breakaway where the attacker is coming in at speed is more challenging but I would argue since the keeper is not limited as far as movement during run of play 1 v 1 scenarios, the PK gets the edge. Obviously most coaches know this and thus, most teams and keepers practice PK s regularly, so the issue here is not “ are you practicing pks, “ but “ HOW are you practicing pks”? Here are two specific tricks which will vastly improve your keepers stop percentage AND your teams shooting percentage.
Many pk practices look like this, many of mine included. I usually work with groups of 5 shooters and two keepers as this best simulates a shoot out, with the keepers alternating shots. My remaining players run passing lines and do touch work until each shooting unit has done 3 progressions. Here is trick #1 : My shooters TELL the keeper which way they are going. Here is why: Many times, keepers do not learn how to react the right way because they spend too much timing guessing which way the kick is going. By telling them at practice, especially early in the season ( or pre season ) the keepers get a chance to commit to the proper form going to the left, right, high and low. It also helps with the shooters accuracy and how the shooter deals with pressure.
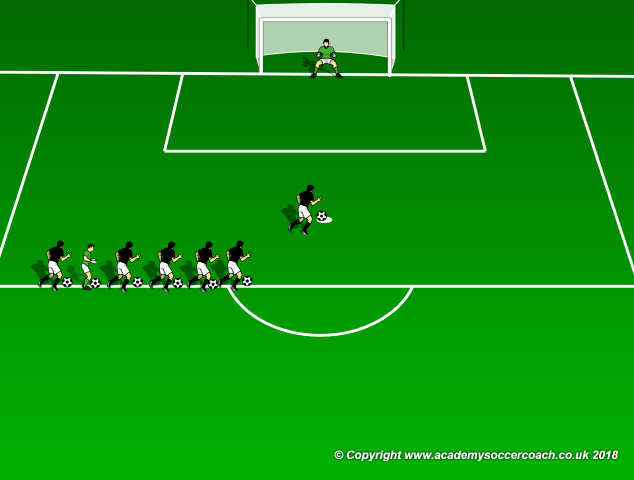
The second trick helps with moving to the ball with a slight forward angle and the most common pk fault, the keeper leaving the line early. With the same basic practice set up, make the keeper start INSIDE the goal.

As shown above, by starting the keeper inside the goal, just a couple feet or one step, yet still asking them to keep the ball in front of the line, it forces them to add a slight forward angle to their lunges and parries. This forward angle can be the difference in a ball being pushed out clear or tipped, spun and then going in. It also allows for any second chance attempts to be made before the ball actually crosses the line. The setup is the same as in the previous activity.
To make this a complete session, have each keeper face 7 consecutive pk attempts, from the line WITH OUT being told the direction. Be sure to include the keepers in the rotations of 7.
Coaching Points
The focus is on keeper form here and committing to a direction once they have tried to make a read ( guess )on the shooters intended shot. The coach should encourage the keeper to be as big as possible, use a slight forward move and aggressively parry shots away.
By Mike Smith
Currently the Head Coach for University Heights Academy Boys Soccer in Hopkinsville, KY , Mike is in his 14th year as a high school head coach with 23 years coaching experience overall and 34 year as a student and fan of the game. He holds a USSF D License.