
- You are here:
- Home »
- Mike Smith
Tag Archives for " Mike Smith "

Goalkeeping Specific Agility and Reactivity
By Philip Cauchi –
The follow three practices target the development or maintenance of agility and reactivity that are specific to the position and role of a goalkeeper. Through these practices we also develop quick footwork, quickly getting into position with reference to the position of the ball with the goal, establishing the correct body profile (stance), and when and how to dive correctly to make a save.
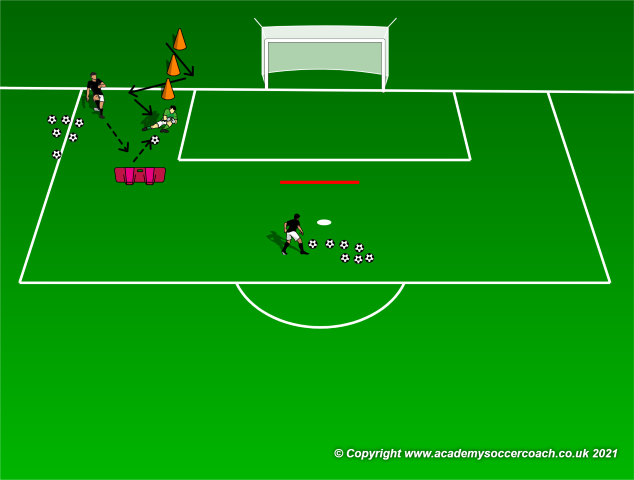
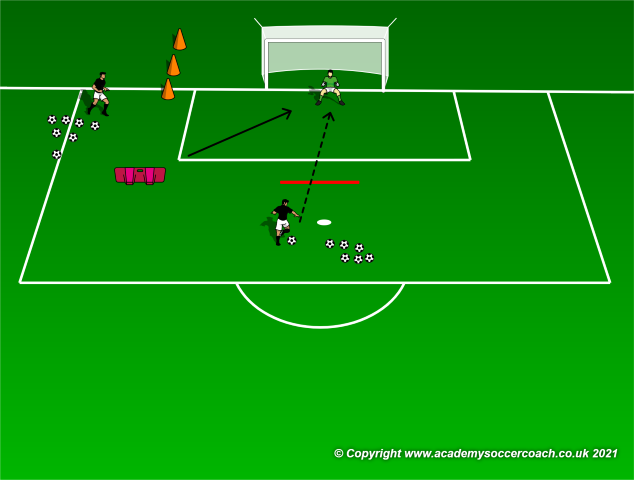
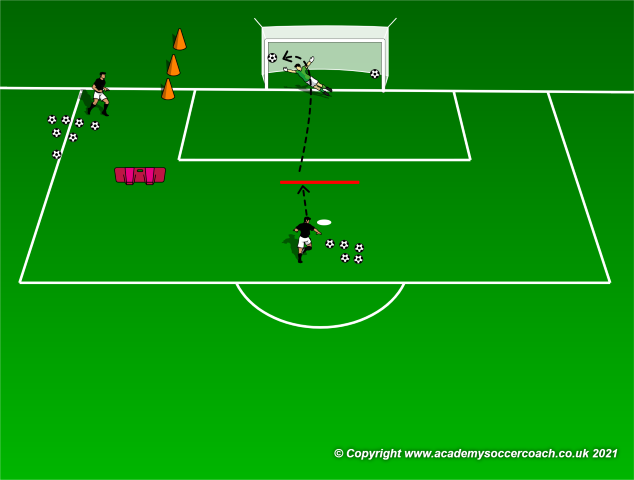
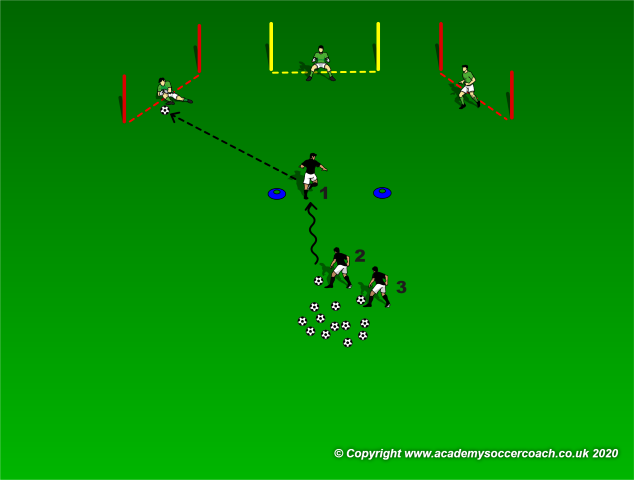
Practice 1: Two goal quick reaction save
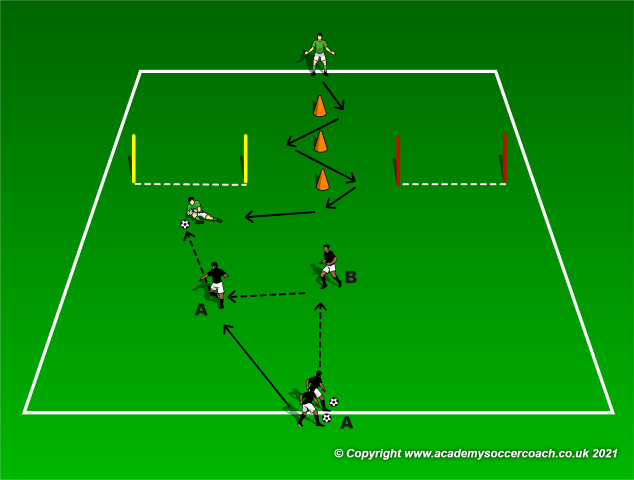
Description: The goalkeeper side steps through the line of cones prior to get into position to either move towards his right or his left to save player A’s shot after the latter wall-passes with player B to finish on either the yellow or red goal. The goalkeeper must quickly recognise where player B lays off the ball to player A so to quickly move into position in the correct goal to save the shot. Player B should be positioned 12 to 15 yards in front and in between the two goals. To increase the difficulty of the practice, player A will be positioned closer to player B thus reducing the time for the goalkeeper to quickly move in the correct direction to make the save.
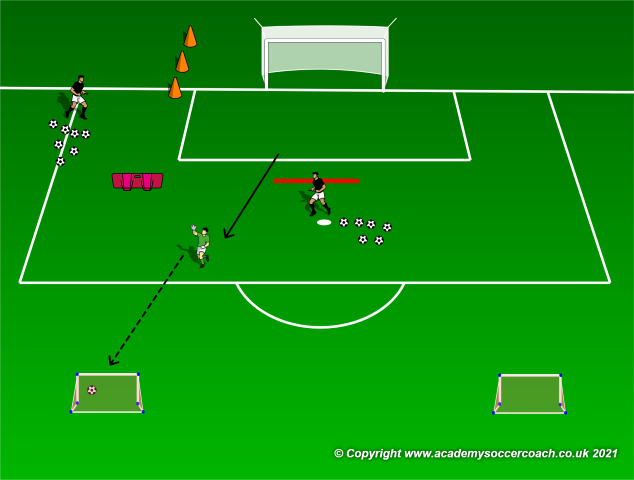
Practice 2: The central goal game
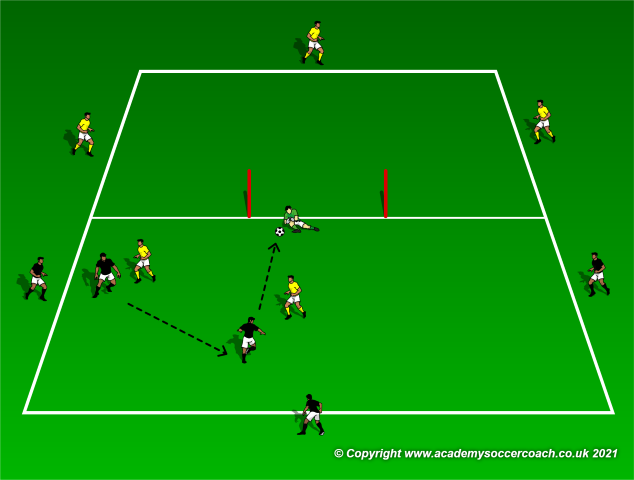
Description: The practice area measures 30 yards by 20 yards and which is divided into two zones with a central goal positioned on the mid-line. A goalkeeper guards the central goal. Each team has its own half from where they are allowed to score. A player for each team is positioned at each side in their own half. Two players from each team roam inside the area. Therefore in their own half, teams will have a numerical advantage of 5v2. The players on the perimeter are also allowed to score. If a goal is scored or won by the defensive team and played into the opposite side, the goalkeeper must quickly adjust his position to protect the goal from a different angle inside the other half of the practice area. When the goalkeeper makes a save, he serves the ball to any other player of the opposite team in the opposite zone.
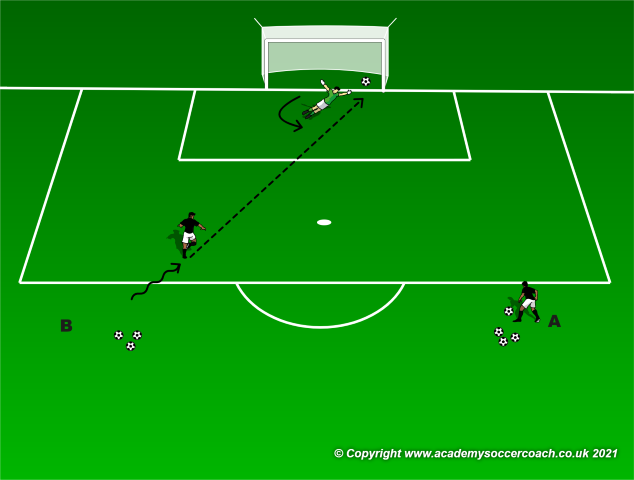
Practice 3: Adjusting quickly to close down the shooting angle

Description: Two servers A and B are positioned at different angles outside the penalty area. The goalkeeper faces the opposite direction (towards his own goal). When the coach calls out the name, or letter, or number representing the server, the goalkeeper must quickly turn to save the shot from the respective server. To increase the level of difficulty and make the practice more complex, when the coach calls a server it will be the opposite server who takes the shot on goal. To make the practice even more challenging we can increase the number of servers and have them dribble their ball randomly, thus continuously changing their angle in respective to the goal.
The first step should always be simple for both the goalkeeper and the servers to understand. From here we can then progress the practice further and according to the developmental requirements of the goalkeeper.
By Philip Cauchi

Facing Penalty Kicks
By Philip Cauchi –
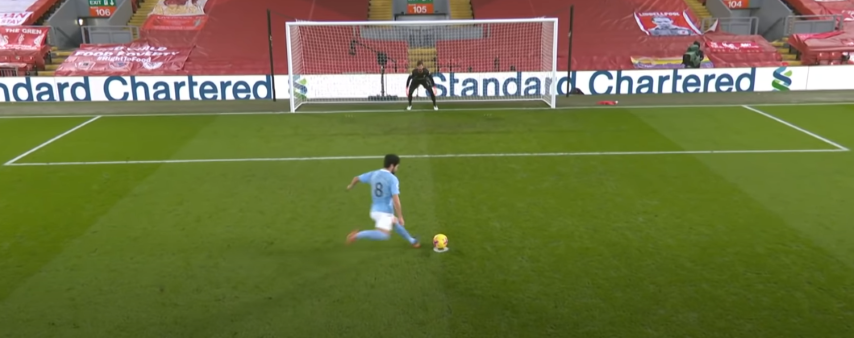
Facing penalty kicks are very challenging situations for any goalkeeper. Goalkeepers haven’t got any defenders between them and the ball within a distance of twelve yards. The defenders must also be positioned at least ten yards away from the ball and outside the penalty area until the shot is taken. Furthermore, goalkeepers must remain with at least one foot touching the goal line until the ball is kicked. This makes it even more complicated for them while providing an extra advantage for the kicker.
However, certain key performance points exist in that they help goalkeepers increase their success rates at saving penalty kicks. We can start by carrying out an analysis of the penalty taker that the goalkeeper will possibly face in the upcoming match. In modern times this can be easily done with the use of highly accurate statistics and match analysis software, where both the goalkeepers and the goalkeepers’ coach can analyse together and into great detail what the favourite kicking foot of the possible penalty takers is, the angle they make with the ball before the run-up, and where they usually aim their shots. Right-sided dominant kickers usually aim their shots towards the right side of the goalkeeper, while left-sided kickers usually aim towards the left side of the goalkeeper. However, this shouldn’t be taken as a rule of thumb but as a probability.
Taking a quick glance at the penalty takers’ eye movement prior to taking their shot might help the goalkeeper in identifying to which part of the goal the kicker aims his shot. One mistake that goalkeepers should not do is to initiate the dive just a few moments before the kick is taken. This is a very typical mistake of goalkeepers who focus solemnly on the swing of the kicking leg. Should this be the case the kicker will probably change the trajectory of the shot at the last minute. This is a trick that some penalty takers use and which goalkeepers should be aware of. The below are the key points that goalkeepers should focus on when facing a penalty kick.
The goalkeeper should be positioned at the centre of the goal in line with the ball. His eyes focused on the ball, feet shoulder-width apart, arms in front of the body and with a low-centre of gravity body stance. A run started from the kicker’s left side typically indicates that the shot will be aimed towards the goalkeeper’s right.
The goalkeeper should not commit himself before the penalty taker kicks the ball. He should however take a note of the taker’s trajectory to the ball and the direction that the support foot is planted.
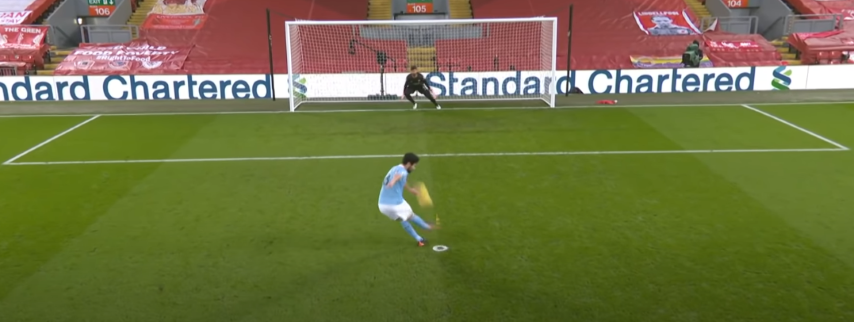
The direction the support foot is planted together with other important information such as that the taker is right footed, that he usually aims his penalties to the right side of the goalkeeper, the direction the hips are facing, and his last glance to where he is aiming the shoot, all provide the goalkeeper with relevant information to make the required decision.
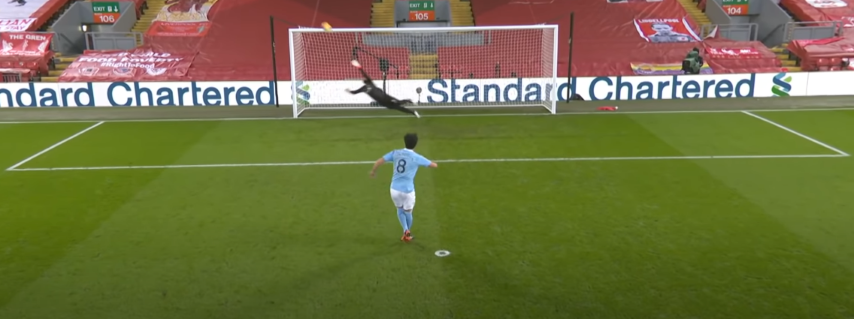
The goalkeeper steps towards the trajectory of the ball by first stepping diagonally forward and pushing off the outside leg. His eyes should follow the ball and arms extended towards the ball to increase his reaching ability.
By Philip Cauchi

Coaching Basic Catching Skills
By Philip Cauchi –
The below are games that develop the basic skill of catching which is a pre-requirement for the development of goalkeepers. These games target the foundation phase between eight and twelve years of age. However, they could also be used with younger ages if the children demonstrate to have the ability to take on these challenges.
Game 1: Throw and catch.
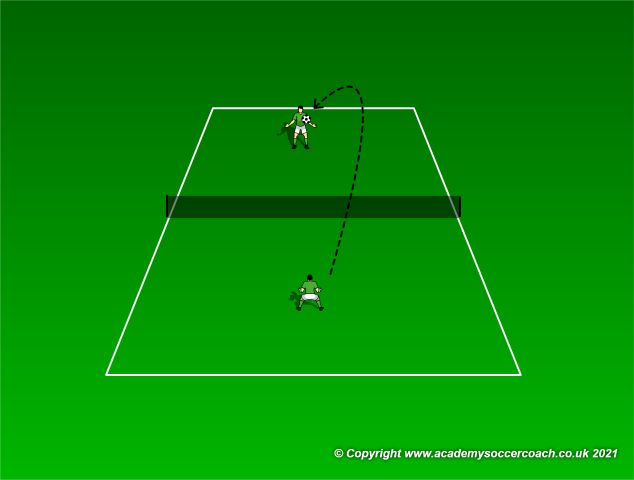
Description: The goalkeepers throw the ball over the net for the other goalkeeper to catch. The ball must not touch the ground. If the ball makes contact with the ground the goalkeeper who threw the ball earns a point.
Variation: The ball may be allowed to bounce once before it is caught.
Key outcomes:
1. Ready stance.
2. Positioning – centrally where the goalkeeper can quickly move to catch the ball.
3. W shape of the hands to catch the ball.
Game 2: Throw the ball to score.
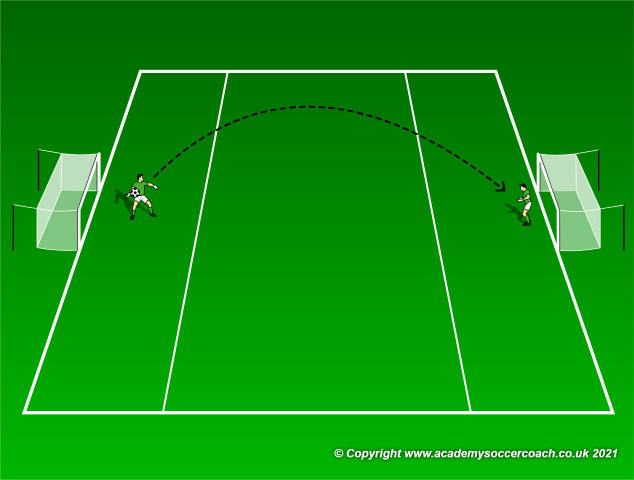
Description: In this game the goalkeepers are positioned approximately ten to fifteen yards apart, depending on their physical maturation. Both of them must defend a goal and aim to score in the opposite. They score by throwing the ball from inside their assigned area (in the above image it is behind the white continuous lines).
Variation: The goalkeepers may kick the ball instead of throwing it.
Key outcomes:
1. Ready stance.
2. Positioning in goal.
3. Quick footwork to get to the ball and make the save.
4. Shape of the hands to catch the ball.
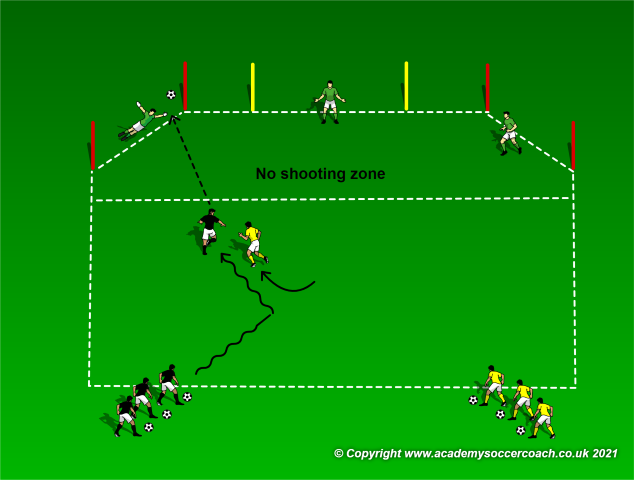
Game 3: 1v1 goalkeeper battle on four small goals.
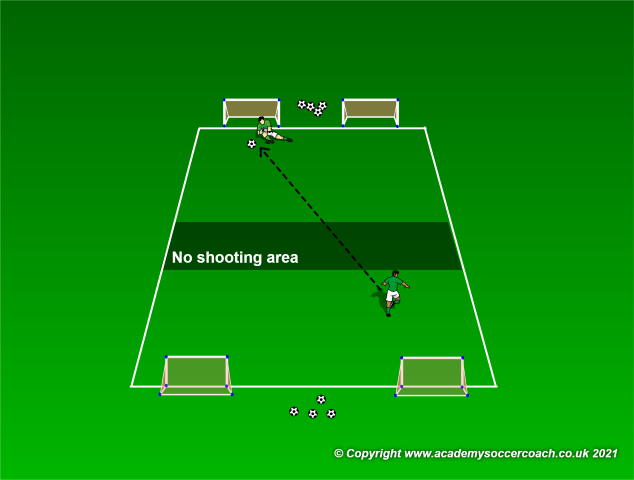
Description: Each goalkeeper defends two mini goals positioned on the same goal line and attacks the opposite two. Both goalkeepers aim to score by kicking and putting the ball in any of the two mini goals. Between the two goalkeepers there is a ‘no shooting zone’. No shooting may take place from inside this zone.
Variations:
1. The goalkeepers may throw the ball instead of kicking it.
2. Each goalkeeper defends and attacks three small goals.
3. Increase or decrease the area of practice according to the ability of the children.
Key outcomes:
1. Ready stance.
2. Arms ready in front and to the side of the body.
3. Quick lateral footwork.
Game 4: The wall game.
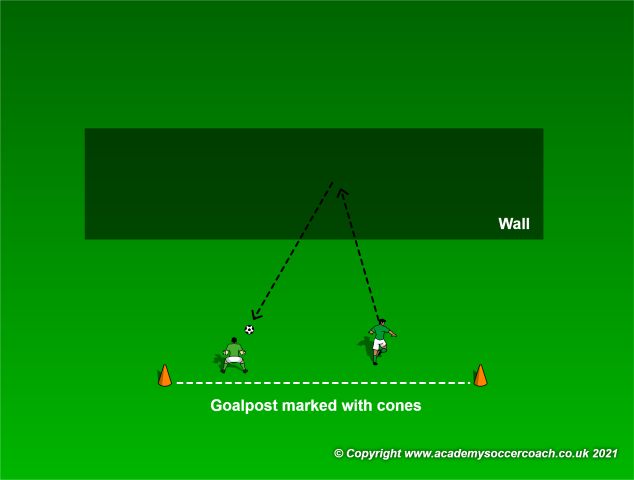
Description: The two goalkeepers aim to score against each other by kicking the ball against the wall and from the rebound it passes between the two cones set as a goalpost. They play continuously by taking shots and making saves.
Variation: More than one goalkeeper takes part. Prior to shooting the goalkeeper taking the shot shouts the name of the goalkeeper who has to make the save. If the latter fails to save the ball and a goal is scored he will be eliminated for that round. Continue playing until only one goalkeeper remains in the game. The maximum number of goalkeepers should not be more than five. This is to ensure that eliminated goalkeepers do not spend too much time waiting. If as an example we have six goalkeepers, we set two simultaneous games with three players in each game rather than six players in one game. This method also makes the game less complex.
Key outcomes:
1. Ready stance.
2. Quick footwork for quick movement to get to the ball.
3. W shape of the hands to catch the ball.
By Philip Cauchi

Two Goalkeeper Sessions
By Philip Cauchi –
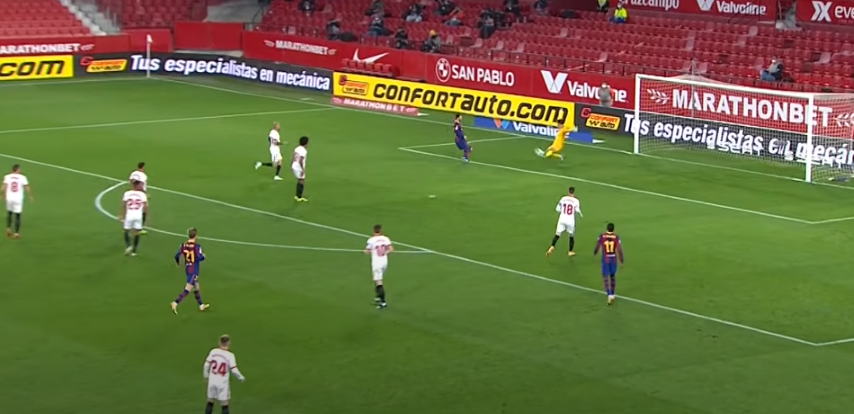
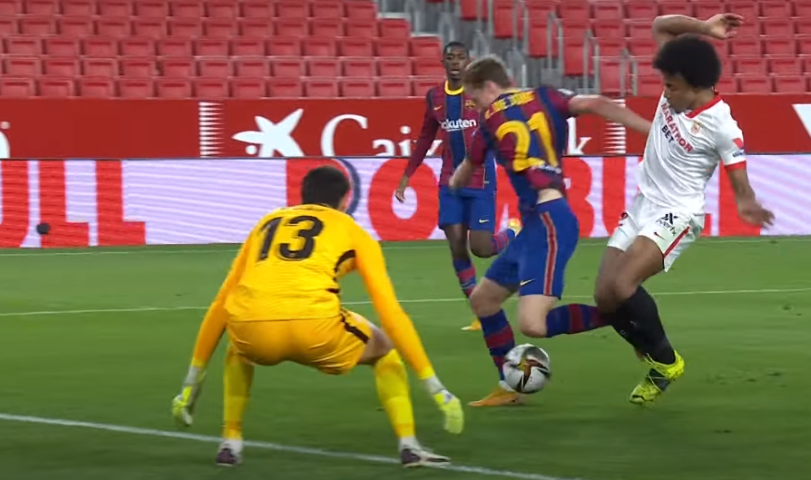
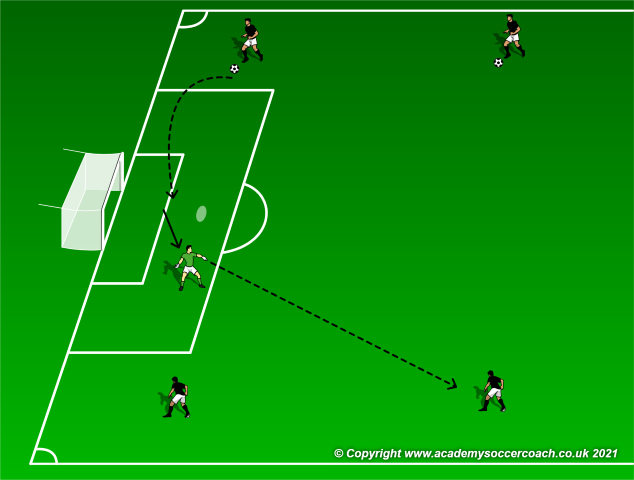
In this article we will go through the key points learned by observing Sevilla FC’s goalkeeper Yassine Bounou against FC Barcelona in first leg of the Copa del Rey semi-final played on Wednesday 10th of February 2021. Following this brief analysis are two practices that target the development of goalkeeping soccer-related actions timed and performed according to the necessity of the situation.
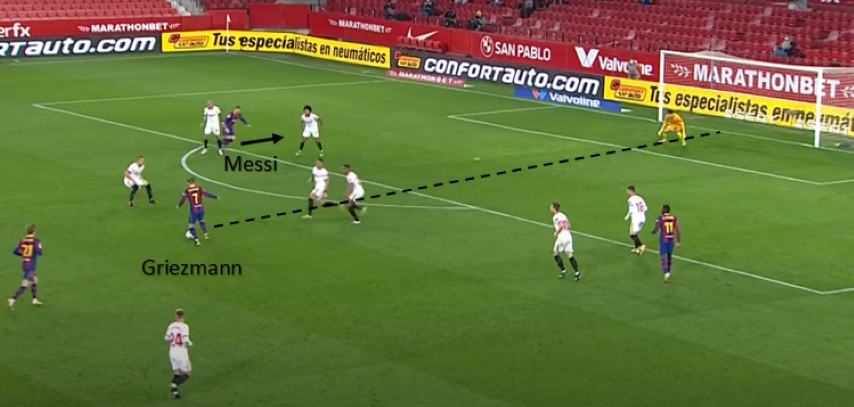
Griezmann is outside the penalty area with the ball and has space to lob it behind the back line and towards the second post for Messi to finish on goal. As we can see from the above image the goalkeeper’s position is on the imaginary line (dotted line) between the ball and the middle of the goal. The goalkeeper’s stance is low, on the balls of feet, with the arms in front and on the side of the body while the body is slightly inclined forward.

Griezmann lobs the ball to Messi to finish on goal. The goalkeeper moves to cover the angle using quick lateral footwork. His is still on the imaginary line between the ball and the middle of the goal.

As Messi is going to shoot, the goalkeeper makes a few steps forward, making himself big so to narrow the angle for Messi.
The goalkeeper remained on his feet until the last moment. The arms and legs were also used to stretch the goalkeeper’s ability to cover more area of the goal .
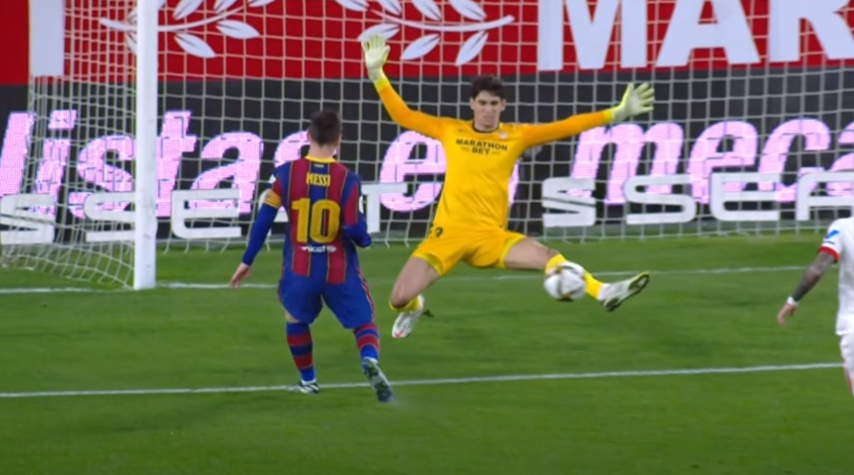
The goalkeeper making himself big to reduce the shooting angle.
Practice 1: Close down the angle
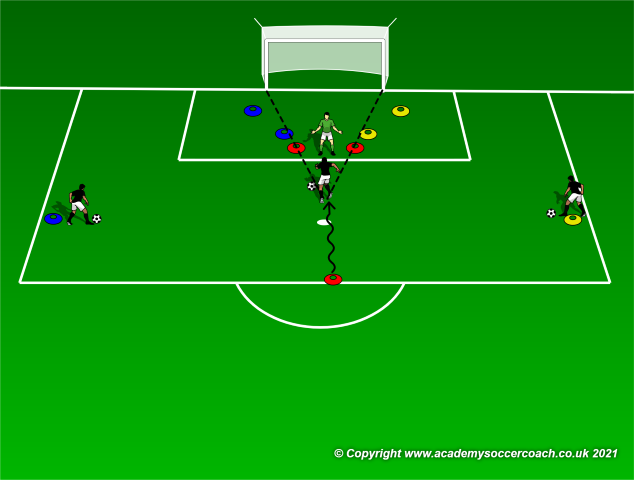
Setup: Three starting points are marked with one being central and at the edge of the penalty area, while another starting point is marked at each side of the penalty area. Therefore having three different angles. A gate measuring approximately three yards is positioned a few yards in front of the goal (as shown in the above image) and on the imaginary line between the respective starting point and the middle of the goal. The starting point should be a few yards in front of the respective gate.
Procedure: The coach calls one of the three players positioned at their respective starting point to dribble forward. The goalkeeper must protect the respective gate from the player’s shoot. If the goalkeeper covers the gate well it means that the ball cannot end up in the back of the net.
Key outcomes:
1. The goalkeeper comes out of the goal as the player is dribbling towards the goal.
2. The goalkeeper makes a forward explosive movement to cut off the angle at the moment the player drops his head to shoot at goal.
Progressions:
1. The player with the ball can shoot from various distances.
2. The player with the ball can change his dribbling trajectory to move to a different angle.
3. The player with the ball can opt to go on one-one-one with the goalkeeper.
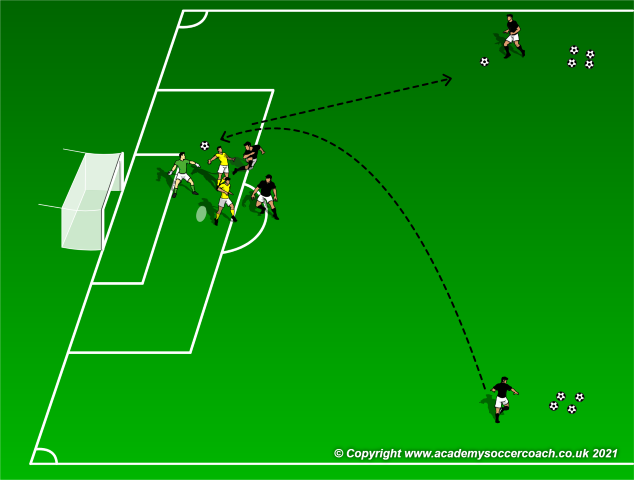
Practice 2: 3v2+GK play the ball behind the back line.
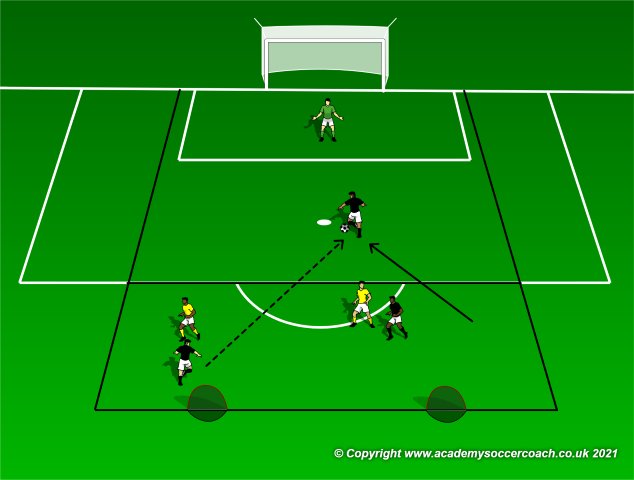
Setup: An area measuring 10 by 18 yards is marked at the edge of the penalty area. The sides of this area are extended till the goal line. At the end of the area two mini goals are positioned. Three attackers and two defenders start in this area while a goalkeeper is positioned in goal.
Procedure: The attackers start against the defenders in a 3v2. The attackers must pass the ball into the penalty area to finish on goal. The attacker receiving the pass must finish with a first time shot.
Key outcomes:
1. The goalkeeper comes out to take the ball or block shots for passes that are played deep.
2. The goalkeeper remains in his position but moves to reduce the shooting angle for the attacker in cases where he cannot get to the ball.
3. The goalkeeper must always be on the imaginary line between the ball and the middle of the goal.
Progression: The attacker receiving the ball can decide not to shoot first time and to also try to go around the goalkeeper.
In the above image, the defender is applying pressure on the ball-carrier. The goalkeeper therefore remains on his feet and move accordingly to close down the shooting angle.
By Philip Cauchi

Goalkeeper Communication On Crosses
By Philip Cauchi –
Introduction: Dealing with crosses is often a major headache for goalkeepers. This holds true when playing against opponents whose strengths lie in this aspect of the game.
Dealing with crosses is a cohesive team effort. First we aim to eliminate or reduce as much as we can the opponents’ strength of getting the opportunities to play crosses. Secondly if the cross is played we should have our centre backs marking their target players and dealing with the cross effectively. The goalkeeper should be the one who continuously communicates with his back line all the time during this period, making sure that the target players are properly marked to reduce their ability to deal with the cross effectively. Communication should be developed throughout the season and refined during the week according to the opposition we are going to face.
Goalkeeping technique cues:
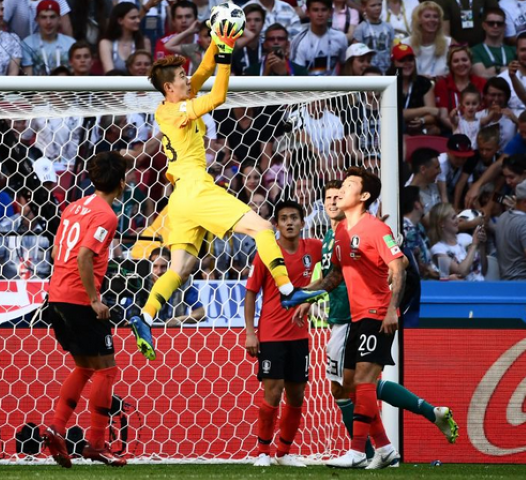
Figure 1 – The goalkeeper should all the time keep his eyes on the ball and be confident of getting to it first.
1. Before the cross is played the goalkeeper should be turned towards the position from where the cross is played.
2. The goalkeeper should attack the ball explosively.
3. Take-off should be done by pushing off the ball of the inside foot while the outside leg is used to protect the goalkeeper when airborne.
4. The shape of the goalkeeper’s hands should be W while the arms are stretched to meet the ball. The goalkeeper is the only player from all the twenty two who is allowed to use his hands inside his team’s penalty area.
5. If the ball seems to be difficult to catch, the goalkeeper should punch it towards the side lines where the chances of the opponents winning second balls in dangerous zones is reduced.

Figure 2 – The goalkeeper should be focused and all the time communicating with his teammates. The word “keeper” should be used by the goalkeeper to let his teammates know that it is his ball.
Training tips:
1. Always make training realistic to what happens during the game. Isolated training to refine technique, coordination and power are good but they serve to nothing if the goalkeeper doesn’t learn how to anticipate situations and communicate with teammates.
2. Whenever possible always have some kind of active opposition with defensive collaboration. The last strengthens the communication between the goalkeeper and the centre backs who are the players who will be put under pressure the most in these situations.
3. Vary the resistance. It can be that the goalkeeper has to face only one forward, two forwards or three forwards.
4. Vary the angle from where crosses are played.
5. Vary the distribution. The goalkeeper should learn to deal with both in-swinging and out-swinging crosses and crosses played onto the first, mid, and second posts
6. Have unpredictability in training! Create situations where the opponents can play both crosses, dribble inside with the ball or play cut back passes.
Goalkeeper positioning during crosses:
Before the opponents are able to play a cross, the goalkeeper should be positioned where he can have a very good vision of both the ball and the crosser as well as his teammates and opponents. The ideal position when the cross is played from deep as in the below picture is for the goalkeeper to be centrally in line with the midline of the goal and a few feet in front of the goal line. This position gives him enough space and time to get to the ball. It is imperative also to mention that the defense will not be too deep as this will restrict the space that the goalkeeper has to attack the ball.
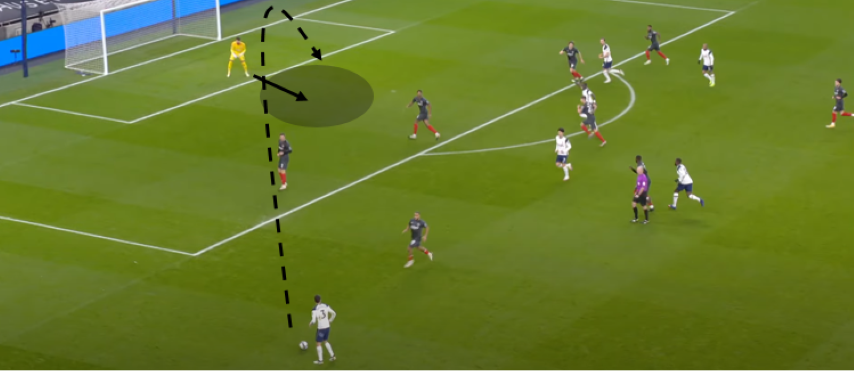
Figure 3 – The goalkeeper’s position should enable him to have a good view of the ball, teammates and opponents.
The stance that the goalkeeper takes might prove to be the decisive factor in such situations. As seen in the image below, the goalkeeper’s position will enable him to get to the ball quickly and cover both the first post, mid post and second post areas. The goalkeeper should have a low centre of gravity with the weight of the body on the balls of feet.
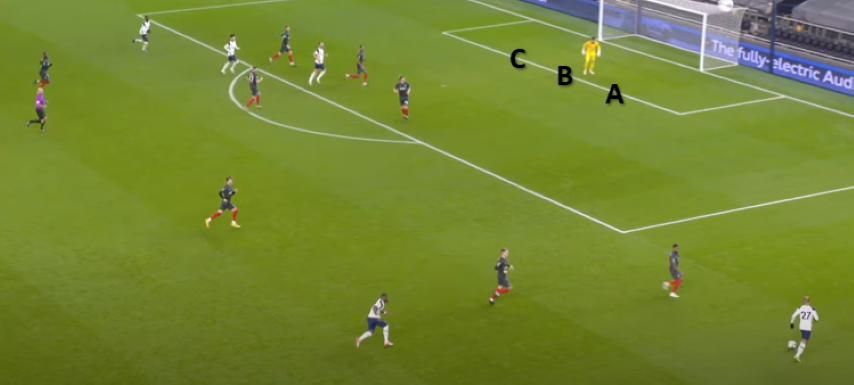
Figure 4 – The first post (A), mid post (B) and second post areas (C) are well covered by the goalkeeper.
Practices:
Timing the interception of the cross.
We have two servers on both flanks. One of them is positioned at a deeper position than the other. The one closest to the goal line plays out-swinging crosses while the other plays in-swinging crosses. Upon catching the ball the goalkeeper makes a few steps with it prior to serving it to one of the two servers on the opposite flank. We can progress the practice by placing mannequins where the goalkeeper is overloaded in taking the correct approach to attack the ball.
Dealing with in-swinging crosses played from deep positions.
In this practice we have a server on both sides who are positioned wide and higher than the edge of the penalty area. In the centre in front of the penalty area we have two centre backs lined up against two forwards and a goalkeeper. One of the servers plays an in-swinging cross for the goalkeeper to come out and deal with together with the help of the centre backs. Two mini goals can also be positioned for the defending team to attack should they win the ball. However in this practice if the defending team wins the ball they aim to play it quickly to the opposite server as if to launch a quick counter attack from the opponents’ weaker side. To overload this practice we can have the server playing crosses from various positions or by dribbling towards the goal line and playing cut back passes. We can also overload by adding another forward which further conditions us to be more precise on intercepting the ball. This will indeed require very good communication between the goalkeeper and the centre backs.
Dealing with in-swinging crosses played from deep positions.
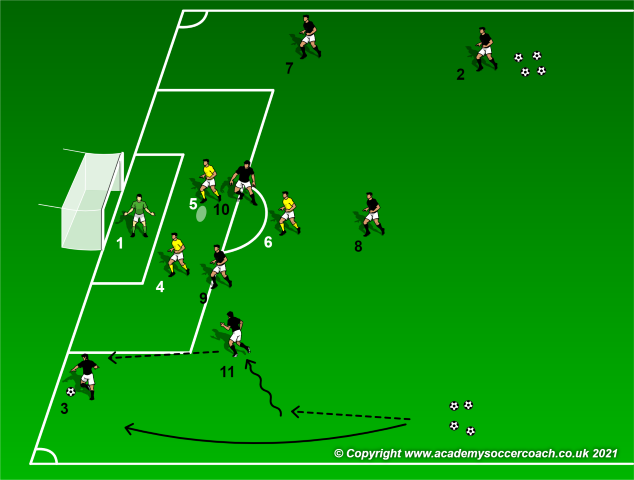
We move on to more complex but more realistic contexts where communication between the goalkeeper and his teammates and the decision-making abilities of the players are to be further developed. In the situation above the full back (3) passes to the winger (11) and overlaps him to receive the return pass to play the cross. The practice is then repeated on the opposite flank. After a few repetitions we should build towards a higher level context which is closer to the realism and requirements of the game and especially of what is expected from our next opponent. Now we can have the winger either returning the ball to the full back to play the cross or himself cutting inside with the ball to take the shot or combine play with teammates inside the penalty area. The full back can also advance towards the goal line and play a cut back pass. The more we practice in situations where the goalkeeper and the defenders are faced with various situations the more we develop communication and this will lead to better decision-making and interceptions of the ball in the game.
By Philip Cauchi

Quick Footwork With Reactions
By Philip Cauchi –
Aim: Getting quickly into position to make the save.
Key points:
1. Quick short side-steps.
2. Weight on the balls of the feet.
3. The weight of the body inclined slightly forward.
4. Leg cross-over technique to quickly get into position.
5. Arms to the side and in front of the body.
Practice: Shooting with three goals.
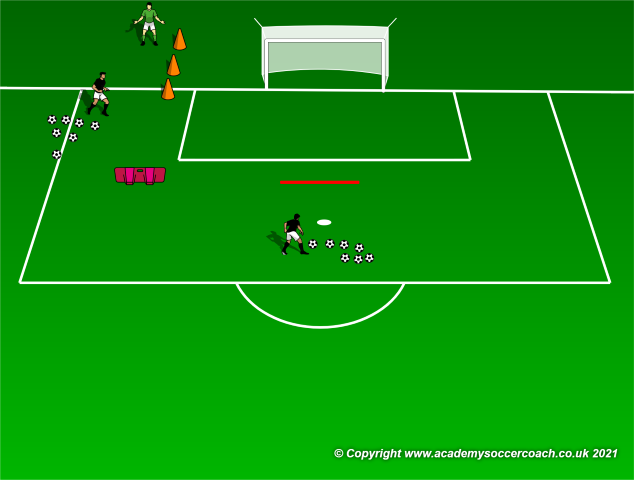
Organization: This practice takes place inside the penalty area and is divided into two parts. The first part consists of a series of cones positioned in a line and a shot rebound wall placed in front and ten yards away from the last cone. A server with a large supply of balls is positioned to the side of this setup. In the second part of this setup we have a server with a supply of balls on the edge of the penalty area and a thick pipe placed horizontally just in front of the goal area.
The goalkeeper perform quick side steps prior to saving the shot from the server which is deflected off the rebound wall. When side-stepping the goalkeeper should make the first step with the leading foot and not the trailing foot. This helps the goalkeeper to maintain the much needed centre of gravity. Make sure that the weight of the goalkeeper’s body is slightly inclined forward and on the balls of feet. The goalkeeper should have her arms placed in front and to the sides of the body ready to perform the save. The server should kick the ball immediately after the goalkeeper gets past the last cone.
Immediately the goalkeeper gets into position to save the first shot to be taken by the other server. The goalkeeper should make use of the foot cross-over technique to be more rapid. For the cross-over the goalkeeper should push off the leading foot and then the trailing foot crosses over it. The cross-over technique is the ideal way of moving laterally fast while keeping the ball in the goalkeeper’s field of vision.
After the goalkeeper saves the first shot, the server kicks the ball hard along the ground. The ball will be lobbed into the air as it is deflected off the pipe. The goalkeeper must quickly react to the unpredictable trajectory that the ball takes.
To make the practice more game realistic, the second server may herself decides if the shot is to be deflected off the pipe or just goes straight on goal. Furthermore, two mini goals may be positioned outside the penalty area. When the goalkeeper makes a save, she throws the ball into any of these two mini goals as if to launch a quick counter attack.
By Philip Cauchi

Dealing With Pressure From Back Passes
By Philip Cauchi –
Introduction: The modern game requires the goalkeeper to be more active in the offensive organization and offensive transition phases of the game. It is therefore of no coincidence that goalkeepers need to be good and very confident with the ball at their feet while under pressure from the opponents who try as much as possible to restrict their time and space to play the ball.
Most of the time the goalkeeper is the first attacker who sets the momentum forward for the team in the first stage of the build-up. Goalkeepers should be very good communicators who continuously organise their team and support teammates during the initial part of the attack construction. Communication is not only verbal! The goalkeeper’s position sends information to his teammates that he is in a good position to support his teammates and to which foot he asks the ball to be played to.
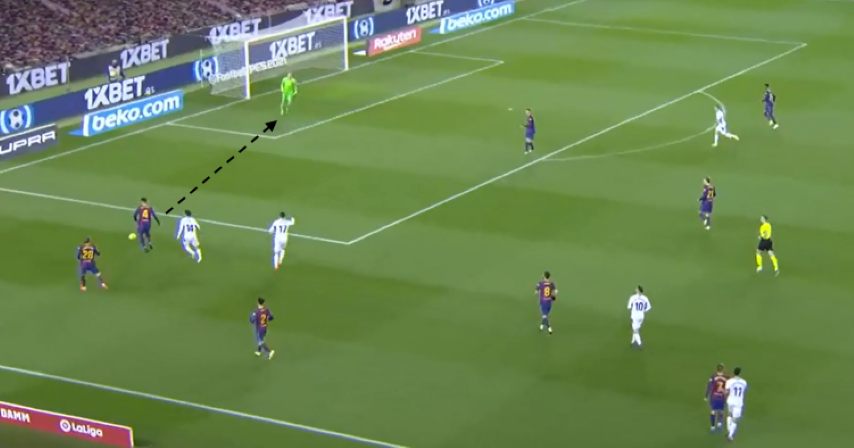
Figure 1 – The goalkeeper’s position sends information to the central defender that he is free to receive the back pass.
Communication plays a huge role for the goalkeeper when dealing with back passes. It starts the moment an outfield player is in possession of the ball. The goalkeeper should move into an open position where he can receive the ball. Training should absolutely include the communication between the goalkeeper and his teammates, especially those who play at a close proximity with him. The practices must also resemble as close as possible the global game, taking into consideration the way that the opponents play and their pressing characteristics on back passes. Do they press with one, two or three players? Which spaces do they leave free? Where do their strengths and weaknesses lie? Are our centre backs and central midfielders confident with playing the ball under pressure and therefore supporting the goalkeeper?
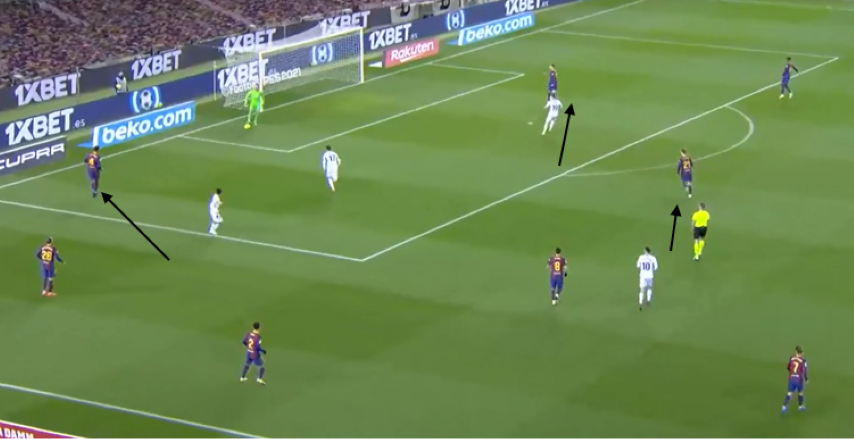
Figure 2 – It is very important to know how the opponents press to condition our build-up.
Having a goalkeeper who is confident and able to play with the feet gives the team more options in the build-up and therefore more confidence.
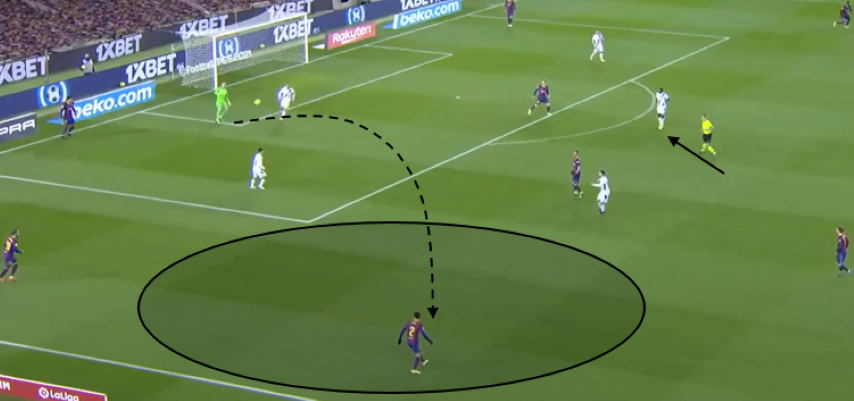
Figure 3 – Communication at the highest level to get out of high pressing situations.
Practice: Two zone build-up game
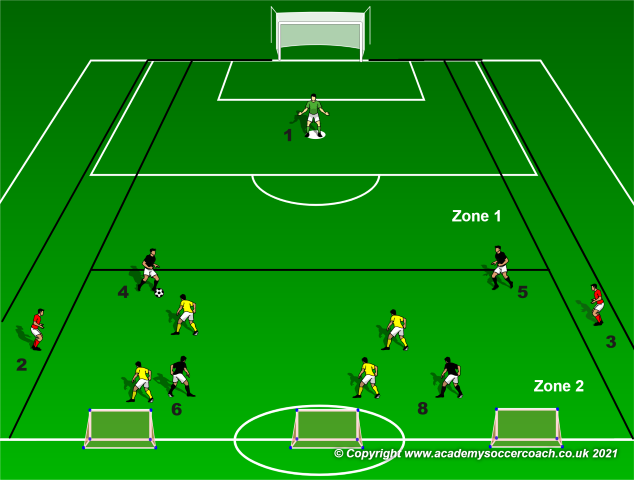
Figure 4 – The goalkeeper should continuously communicate with the two centre backs.
This game is about developing the necessary communication between the goalkeeper, the back line and the central midfield players. These are the three units of the team that will be involved the most during the first stage of the build-up.
Organization: One team composed of a goalkeeper, two central defenders and two central midfielders, while the opposite team is composed of two forwards and two central midfielders. Two neutral flank players play with the team in possession of the ball.
Description of practice: The attacking team (the blacks and the team that we are coaching) starts play in zone 2. The attacking team’s aim is to score in any of the three mini goals. They are aided by the two neutral flank players. If the attacking team cannot score within thirty seconds the ball must be played back to the goalkeeper and the attack is restarted. Here is where we can differentiate the way to overload our build-up. In the below diagram we are simulating the build-up against a team that leaves one forward up and three midfielders further back and positioned centrally. In this case the attacking team is asked to drop only the two centre backs as only one forward moves into zone 1.
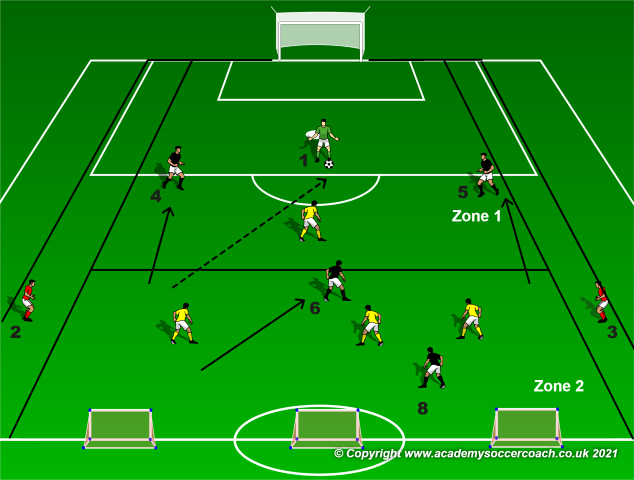
Figure 5 – Creating a 3v1 at the back.
The key points to focus on here are:
1. The angle the goalkeeper is forming with the two centre backs and especially with the one with the ball.
2. The timing and direction of the back pass (to the side away from pressure and where the goalkeeper can play the next pass).
3. The speed of passes.
4. The new position the center backs take (angle and distance from the goalkeeper) to support the goalkeeper when the latter receives the ball.
When the goalkeeper plays the ball to any of the two centre backs – or any other player in this case – the other players must quickly move to adjust their position to support the player on the ball with the sole intention of playing forward. However, the goalkeeper’s job is far from done. He should retain his position and also to move according to the necessities to offer support to his teammate on the ball. The goalkeeper should again be ready to receive a back pass to either play forward or switch the point of attack.
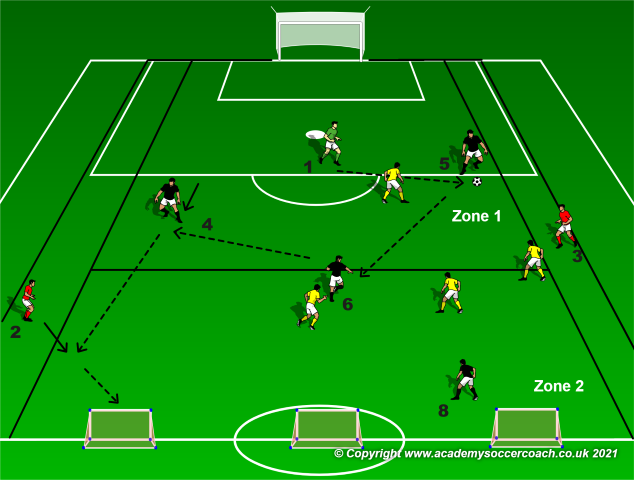
Figure 6 – The goalkeeper should quickly recognise what the options to play forward are and where they exist.
The key points to focus on here are:
1. The angle and distance of the goalkeeper with the two centre backs.
2. The distance the goalkeeper has with the forward applying pressure on the ball.
3. The position of the farthest teammates (midfielders) to stretch the opponents and create space to open up options centrally.
To further overload the build-up we can also introduce a time constraint where the goalkeeper’s team has to quickly play the ball into zone 2 in ten seconds or less. When the ball is played into zone 2 all the players except the goalkeeper move into this zone. Play always starts from the goalkeeper’s team in zone 2 even if a goal by his team is scored.
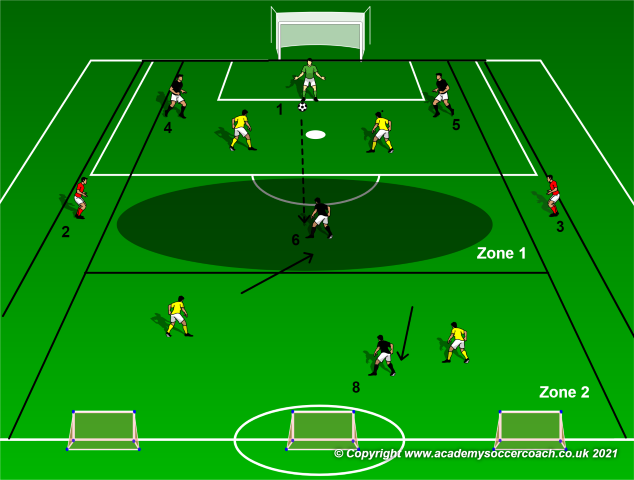
Figure 7 – Building play from the back against two forwards applying pressure. The shaded area is the target key space where we aim to play the ball either through the forwards or around them if the option to play directly to midfielder 8 does not exist.
By Philip Cauchi

Visual Quick Reactions
By Philip Cauchi –
Title: Reacting quickly to visual stimuli.
Aim: To develop quick reflections specifically for goalkeepers.
Key points:
1. Ready stance in goal.
2. Focus on the position of the ball.
3. Look at the hips of the attacker to anticipate where the shot is aimed.
Practice: Shooting with three goals.
Preparation: Three goalposts made with poles are positioned as shown in the above image. The goalposts should three yards from each other. Fifteen yards in front of the central goal is a gate marked using two markers. A few yards behind this gate is the starting point from where the attackers start their dribble.
Description of practice: The attackers start dribbling the ball forward before shooting in any of the three goals. Shots must be taken from inside the marked gate.
Progression: The attacker first dribbles the ball to shoot on any of the three goals and then immediately receives a pass from the next player in line to finish on the same or a different goal.
Practice: 1v1 on three goals with goalkeepers.
Preparation: The practice area is divided into two zones. The first zone measures fifteen yards by twenty yards. The second zone measures ten yards by twenty yards. Three goalposts that can be made of poles are positioned as shown in the diagram above. A goalkeeper is positioned in each goal while two lines of players are positioned at the end line and approximately twelve yards from each other. All the players have a ball.
Description of practice: A defender from one of the two groups starts from the middle of the first zone. A player from the other group dribbles forward to get past the defender with the intention of shooting on any of the three goals. After the attack is over, the attacking player remains on the pitch to defend against the attacker from the opposite team.
Progression: Play 2v2 and then 3v3. This should make the practice more complex and unpredictable, especially for the goalkeepers.
Practice: Quick reaction shooting with three goals.

Preparation: The practice area is thirty yards by thirty yards. Three goals are positioned as shown in the image above. Two servers are positioned at different angles from each other. An inner ten yards by ten yards shooting area is marked at the end of the larger area opposite the goal in the middle.
Description of practice: Servers take turns passing the ball to the player inside the shooting area to finish on any of the three goals. Four consecutive balls are to be served and then the player inside the shooting area switches places with one of the servers.
Progression: The player inside the shooting area can decide to go 1v1 against the goalkeeper.
By Philip Cauchi