
- You are here:
- Home »
- Author's Archive:
All posts by mikesaif

Be a Distraction In Goal
By Mike Smith –
I was first introduced to the concept of being a distraction in goal through what I felt at the time was a poor choice of words. I actually always wanted to be a full time keeper but as I was always small – I was only 5 feet tall 100lbs when I graduated high school ( compared to my now towering 5’8 170lb frame ) -I never really earned any serious consideration. I was a decent striker so even though I was always destined for the field, I took every chance I could to get in goal and was designated as the emergency keeper as few times. This is where I was told to “ get big “. Getting big wasn’t my strong suit but when a coach explained further the need to simply distract the shooter, this made more sense. While “ getting big” was certainly a part of being a distraction, I found there were other ways to get a shooter off their mark as well, many which could be practiced.
Set Up
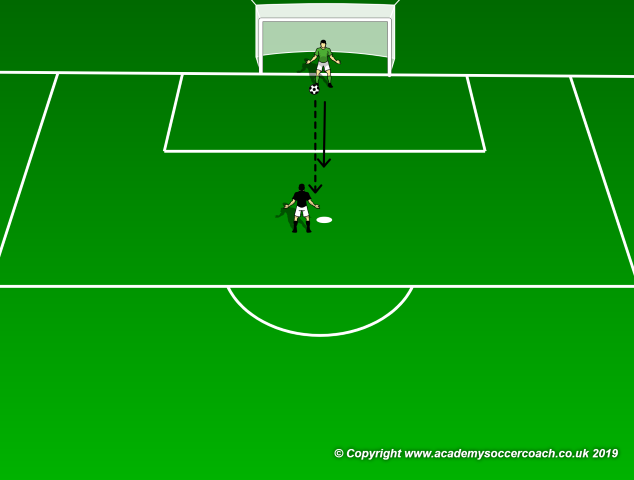
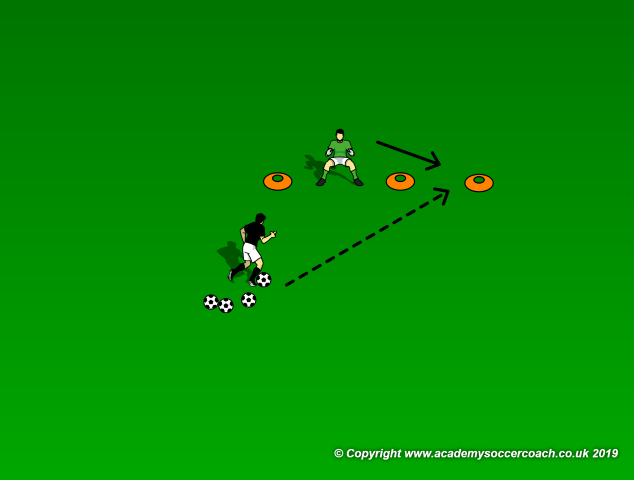
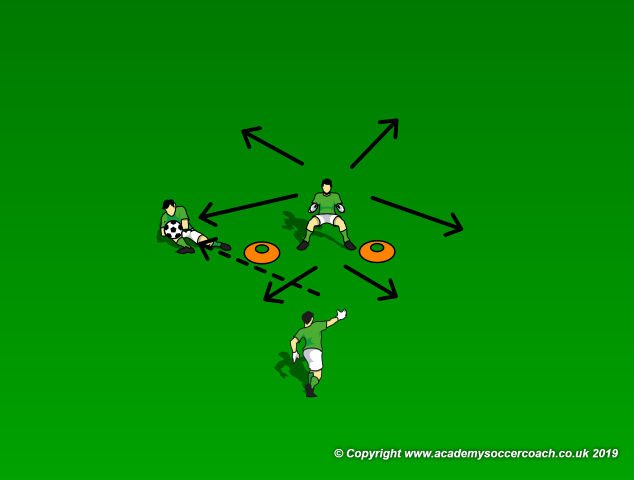
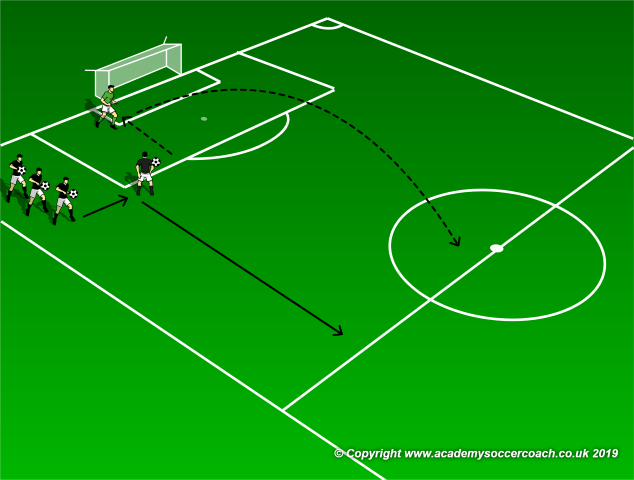
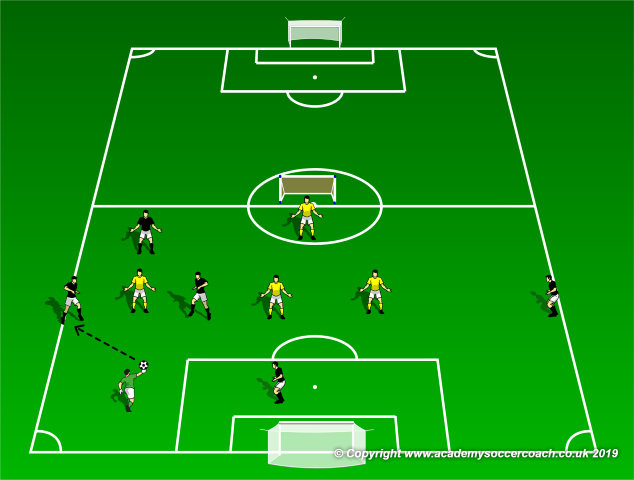
As shown above, one of the best ways to distract a shooter is just to shut down the space. ( I should note here, this can be a really fun and useful practice, but players should be encouraged to be careful and not get reckless when either charging or getting charged ). Let the keepers send a ball out to the pk spot where the shooter has 2 touches including the shot as the keeper closes them down. The keepers should get low, wave their hands and even yell as the shot is being taken. Just like in golf, a well timed “ AHHHHHHHH” can make all the difference in a perfect drive or a slice.
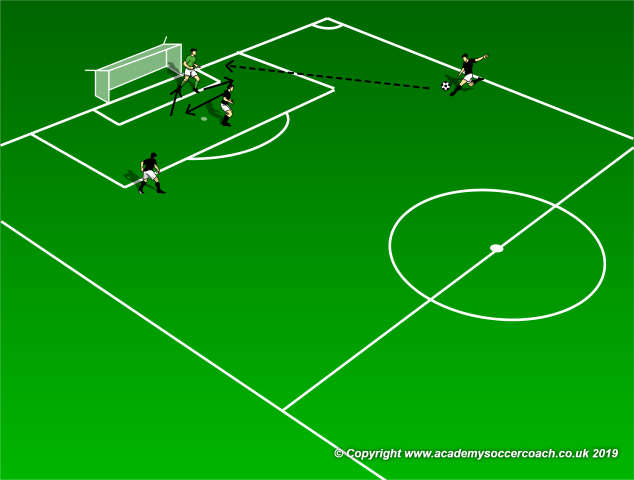
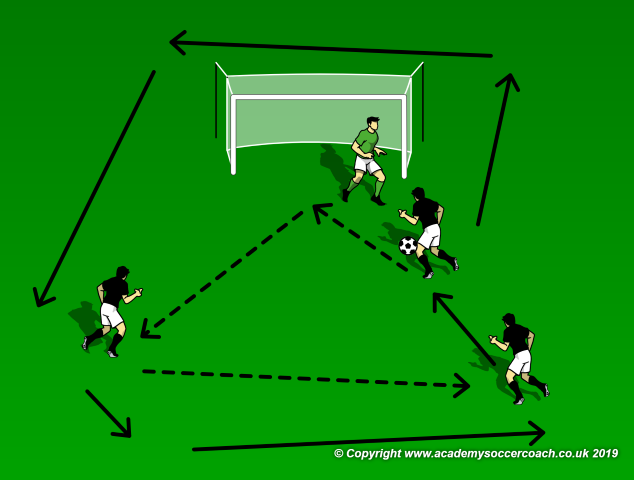
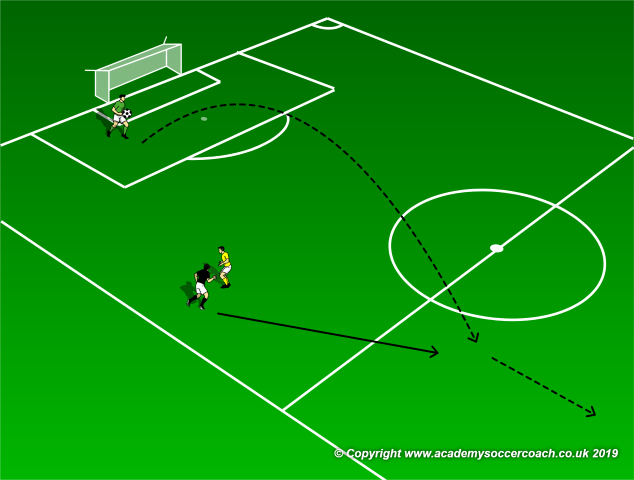
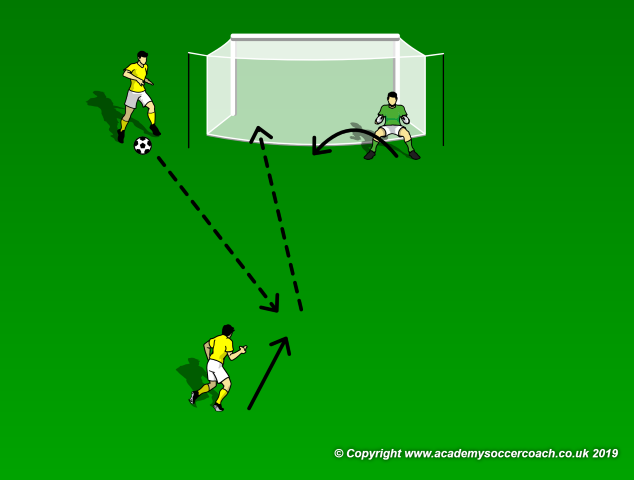
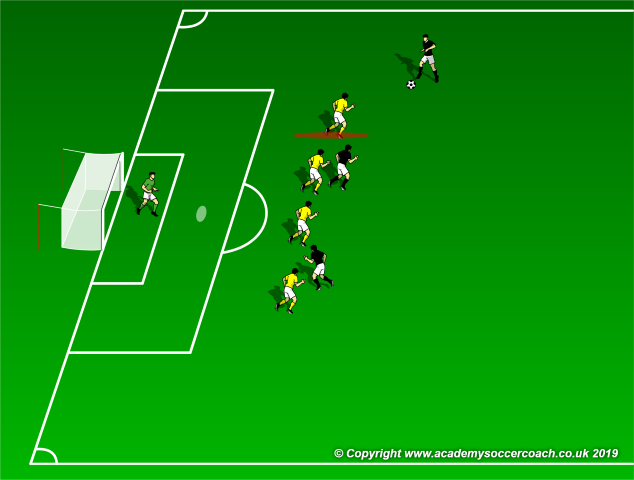
Another way to distract the attack in general is with some well timed movement. Too many times keepers get set up early for a cross and allow the near post runner to get too good of a read and run on the space. Without getting out of position, a keeper can move up, across and back and still be in position to make the save. This will throw off not only the shooter / server but also the attackers running in to finish. Set it up just as it is shown above and try it. Free service to a near and far post run. With a more active keeper, the scoring percentages will go down.
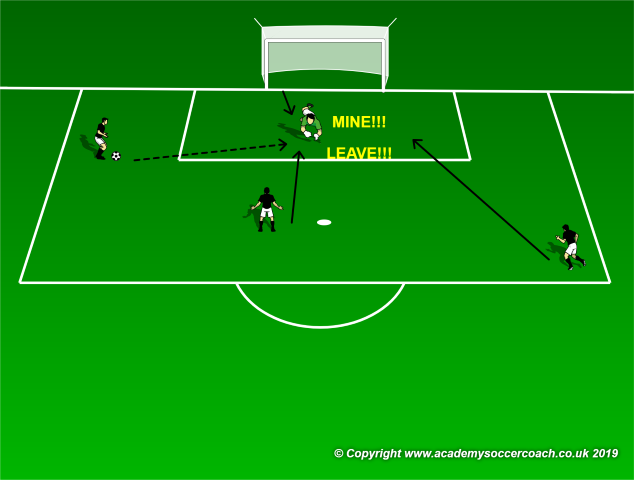
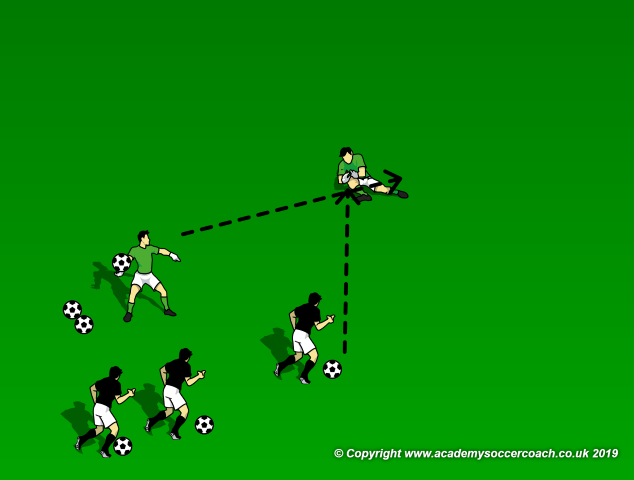
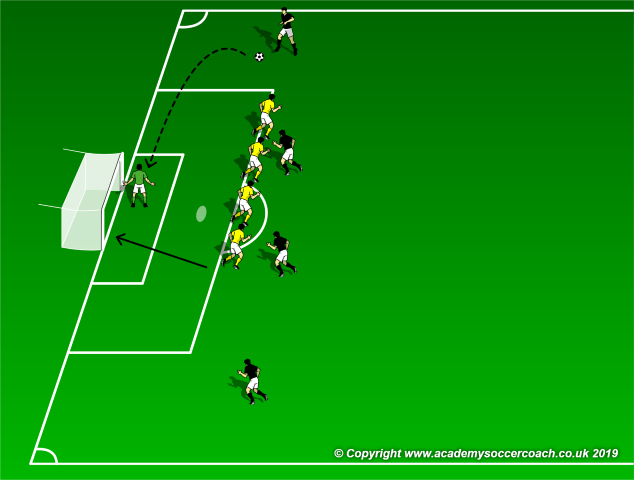
Finally, as shown below, a vocal keeper will always be a distraction and while I don’t condone trash talking, a bit of honest trickery doesn’t hurt. What I mean is, keepers always seem to yell “ AWAY” or “ CLEAR” or “ KEEP” while attackers seem to yell “ HAVE IT” or “SHOT” or “LEAVE”. Both sides seem to use “MINE” but in a box with 20 players in it, just who is “MINE” is not always clear. I have seen keepers ( mine included ) stifle a wide open shooter by yelling “LEAVE” as they pounced on the cross. Dirty pool? Not in my opinion. Again, set up a finishing drill with a near and far post run and with out telling the attackers, have the keepers yell out common attacking words to see if they can throw off the shooters a bit.
Coaching Points
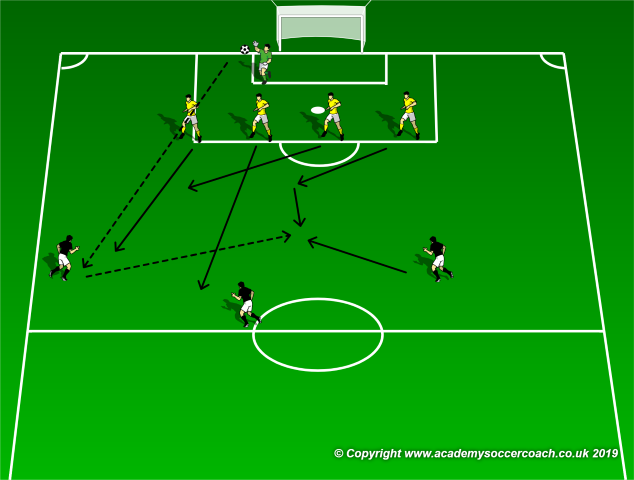
This is a great change of pace practice for the entire team, but the tenants are useful. In addition to waving arms and a wide stance ( getting big ) a keeper who isn’t afraid to come out on a shooter and close down the space, take up the finishing space with movement on services and use vocal cues and deception will come up with a few cleaner sheets than one who doesn’t. The coach should work through these activities first and then use a half field scrimmage or corner kick drill to put the idea of being a distraction into play.
By Mike Smith
Currently the Head Coach for University Heights Academy Boys Soccer in Hopkinsville, KY , Mike is in his 14th year as a high school head coach with 23 years coaching experience overall and 34 year as a student and fan of the game. He holds a USSF D License.

How to Extend a Goalkeepers Reach
By Mike Smith –
Just as most field players have a dominant foot, most keepers have a dominant leg they prefer to push off from. This usually corresponds with the dominant foot so if your keeper is right footed, chances are they prefer to launch from their right leg. I teach my keepers to shift their weight to the “ inside “ foot i.e. the foot closest to the ball. This actually helps with going to ground quickly but also puts the keeper up to 2 feet closer to the ball when going for wider shots. In right foot dominant keepers IF there are always more misses on shots taken to their left side, it could be a problem with holding their weight on their dominant leg. Take some time at practice to identify your keeper’s dominant foot and then make sure they are shifting their weight to the less dominant side when needed to help them extend their reach.
Set Up
Place a couple cones 3 ft apart and have your keeper(s) start from the middle. Have a shooter or coach send a few shots wide to the goalies right and mark the edge of their reach. Repeat this on the left side and see if there is a difference. Many times, especially in the youth ranks, the keeper can cover a greater distance when their dominant leg is the inside leg.
As shown above, work on increasing the distance covered on the non dominant side. This should be done from a traditional sense to increase the strength and distance on the non dominant side, but there is also power in recognizing which side is non dominant as the keeper can also use a shuffle step when facing shots from their “ weaker” leg.

Have the keepers shuffle to the edge of the 3ft cone before making their dive. By recognizing their weak side the keeper can be trained to take that extra step until 1. They strengthen their weak side and 2. They add the shuffle step to their strong side as well thus increasing their reach even more.
Coaching Points
A full fledged shooting drill can end this session to help mark improvements in a match like setting. The coach should use this as a developmental and tactical tool to help their keepers develop individually but also be tactically aware of how to compensate for their weaknesses and play to their strengths. Solid weight transfer and the shuffle step should be the focus of all the coaching here.
By Mike Smith
Currently the Head Coach for University Heights Academy Boys Soccer in Hopkinsville, KY , Mike is in his 14th year as a high school head coach with 23 years coaching experience overall and 34 year as a student and fan of the game. He holds a USSF D License.

Saving the Ball With Your Legs
By Mike Smith –
Maybe not every game, but certainly every season I have ever been a part of I can remember a great kick save or two. I actually had a keeper several years ago who routinely pulled off amazing kick saves,( most of the time at the expense of the more fundamental text book save) but since he was the only player who would step up and get in goal in a year where I started 7 players on my varsity squad who had never played soccer, I rolled with it. In fact, it was that year I decided to actually practice kick saves with all my keepers as I found it was something many coaches and teams neglected. I discovered a couple sessions each year on kick saves will pay dividends every season, and is usually a fun change of pace for the keepers.
There are two common scenarios where the kick save comes into play: 1. A stab from the standing position when the ball comes into view quickly on the unexpected side, including with deflections and 2. After the keeper has committed to a dive and the ball skips or bends or is deflected past the hands but still across the body to the opposite side. Both these situations can be practiced.
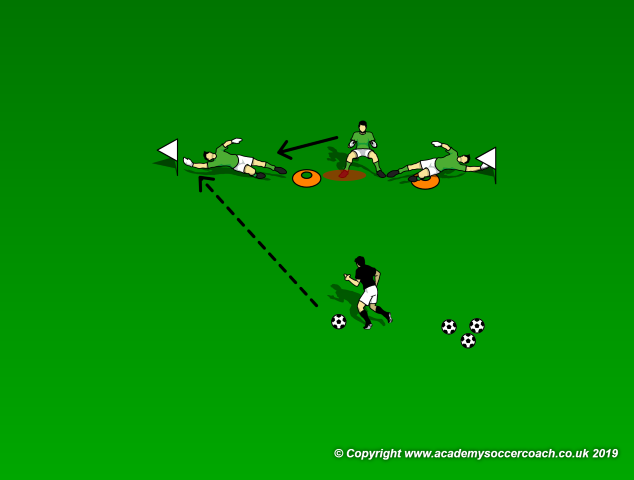
Set Up
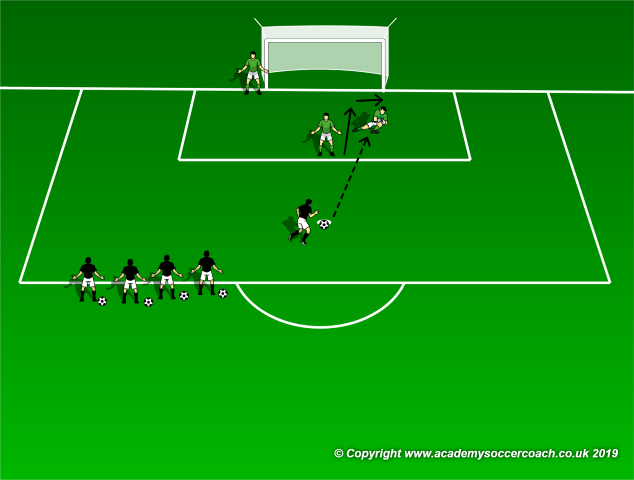
As shown below, 3 “attackers” set up to attack the near post but then roll the ball into the far side netting. To start, the balls should come where the keeper can easily “stab” their foot out to deflect the shot. Hopefully, the keeper can slide their foot under the ball causing it to go as high as possible. An attacker is positioned to receive this deflection and pass it to the next shooter. The shooter rotates around the back of the goal to the deflecting position. As the players get a feel for it, have the pace quicken. The shooter can also be given the option to shoot near post as a progression which will force the keeper to stay focused on the traditional save as well as the stab.
Progression
While the stab is not the optimal saving technique, the actual kick save can be. As shown below, have the shooters send a ball into the keeper so the ball can be trapped into the chest. As this is happening, have another keeper throw a ball in which must be kicked away, again, as high as possible.
Progression
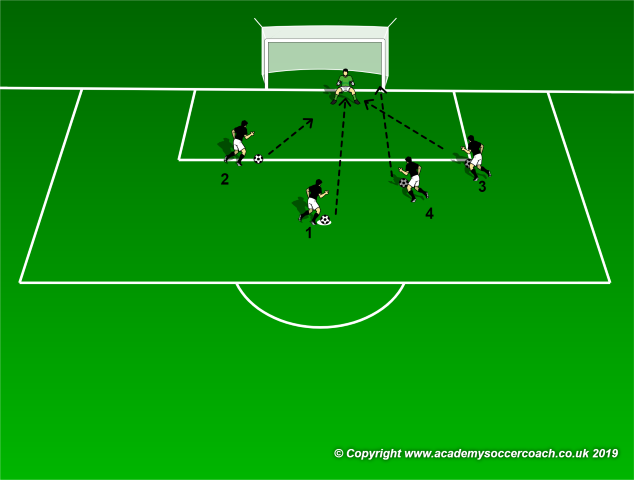
Finally, position 4 shooters as shown below. The first ( 1 ) shooter takes a shot RIGHT AT THE KEEPER from the PK spot. The keeper holds onto this ball. The second shooter ( 2 ) rolls a ball in on the ground which the keeper must pop up as high as possible. The keeper then drops the held ball and receives a shot from the third shooter ( 3 ) which they must go to ground to save. The keeper holds onto this ball as they will immediately need to make a kick save from a shot from the fourth ( 4 ) shooter. IF the shooters are not accurate enough the balls may be thrown in to start until the keeper has had several reps at each station. When the actual shooting starts, if every shot isn’t perfect so be it, not every shot in a game will be perfect as well and this will also help shooting accuracy on the attacking side. Groups of 4 shooters can rotate in and out to make this a full team activity.
Coaching Points
This is a good change of pace drill to help keepers understand all their options and make sure they are in position to do whatever it takes to keep the ball out of the net. The coach should make sure the keepers feet are active and not flat for the stab save and make sure when the keeper goes to ground the top leg is ready to kick at anything which may get past, this will pay off on match day.
By Mike Smith
Currently the Head Coach for University Heights Academy Boys Soccer in Hopkinsville, KY , Mike is in his 14th year as a high school head coach with 23 years coaching experience overall and 34 year as a student and fan of the game. He holds a USSF D License.

Getting Your Chest on the Ball
By Mike Smith –
“ You play goal keeper with your feet, not your hands.”….. “ And really, you are trying to get your chest to every ball.” These two statements rocked my youthful understanding of goal keeping as at 10 years old I was really really sure being a goalie was all about using your hands. What my coach was trying to get out of me was a simple improvement many of us can get out of our keepers, especially young ones: better footwork and increased range of motion from the arms – plus, the ability to safely smother a few more shots rather than bat them back into the danger zone.
Just like the goal of every academic test is to get 100%, the goal of every save is to be in position to trap the ball safely into the chest and start the possession going the other way. Just like testing, the 100% isn’t always going to happen, BUT if 100% is the goal there will be far more A’s and B’s than C’s and D’s. In the net, if the goal is to get every ball to the chest, then those near misses from poor footwork and those flubbed rollers from not going all the way to ground will turn into saves. I guess in sports this improvement is like going from an F to an A in the classroom. Simple concept, often overlooked but will yield big gains if given some work.
Set Up
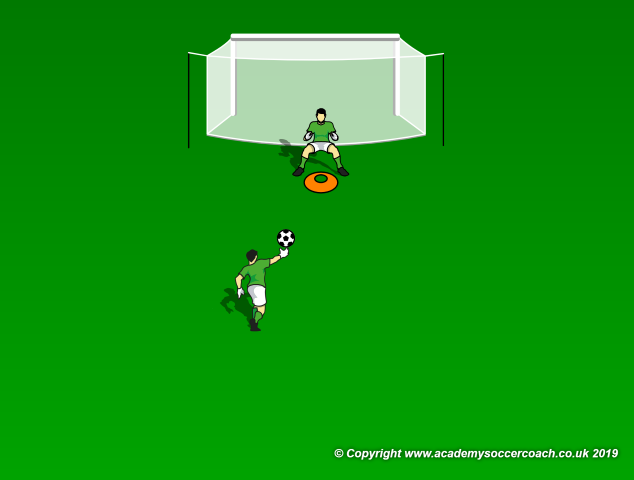
As shown below, have a couple keepers work together moving side to side, up and down and forward. To start off the balls are thrown. The idea is to bring the ball into the chest, from directly in front of the chest. Make sure the keeper making the save is pushing off the inside foot and taking the extra step to get their chest to the ball, not just leaving from where they start ( between two cones place about 3 ft apart).
Progression 1
Next, bring on your 4 -6 best shooters and practice as shown below. The shooters start at the penalty spot and the keeper starts at the top of the 6. When the keeper starts to back pedal the striker takes a shot to the corner. To start, the shooter will tell the keeper where the shot is going. At the moment the ball is struck, the keeper should commit to trying to trap the ball into the chest. As a warm up for the shooters, the shots should initially come at ½ to ¾ pace so the keepers can get to their chests completely to them. Keepers rotate every 4-6 shooters and after each rotation the speed and pace should increase.
Progression 2
As shown below, change the format a bit to involve a service across the box to a shooter who will attack the near post but then send the ball across for either a far post shot or finish to a crashing attacker. The goal is the same, smother the cross. While the diagram shows this happening on the ground, it can also happen in the air. This is perhaps the most game specific need for this skill as winning a cross cleanly both stops an attack cold but also sets up an almost definite counter. Groups of two can rotate in on multiple keepers.
Coaching Points
By default this drill will put the keepers in better position to make all types of saves because if they are getting their chests closer to the ball they will have increased range of motion with their arms. However, the added focus on the footwork and taking that extra inside step to get the chest there will result in fewer “flubs” and second chance goals all while creating more counter opportunities. The coach should focus the keepers on the overall goal and proper footwork during all 3 activities.
By Mike Smith
Currently the Head Coach for University Heights Academy Boys Soccer in Hopkinsville, KY , Mike is in his 14th year as a high school head coach with 23 years coaching experience overall and 34 year as a student and fan of the game. He holds a USSF D License.

The Perfect Goalie Punt
By Mike Smith –
I am taking over a new program this fall, one which has struggled with coaching consistency and on field performance. This has me thinking about many of the simple things I have used to help players improve quickly over the years. In a perfect world, my keeper would not punt the ball but roll it out to an open player, who would start a chain of 5 – 7 passes to feet which would result in a service which beats the keeper for an open player to simply finish in an open net somewhere inside the 6. I have yet to spend more than a few fleeting seconds in that perfect world. In the middle school, junior varsity and even varsity ranks I always encounter the keeper who can punt it past half field effortlessly so in turn, this has been used as “ instant offense” – with the caveat the higher the punt the better.
As long as this punting does not come at the expense of the keeper’s overall soccer experience as a whole, I will admit to embracing some punting. In fact, a quick area punting can be improved on is getting the keeper to understand when to loft the ball ( the most common natural result of a keeper punt ) and when to arc the ball. The overriding principal is to get the keeper to start considering how their target player needs to receive the ball and / or which type of distribution is best in the given situation. Here are some examples:
LOFT
IF your side is better in the air. IF you just want to kill some time. IF you are trying to compact the opponent in a certain area then a lofted punt is fine. This is the most common type of punt, “ Just get it to the half line”. However, a simple punt can be a glorified clearance ( i.e. give away ) and the same instructions coaches give defenders for clearances – HIGH and WIDE, are often the same as they give goalies for punting as a distribution.? This is where the idea of arc comes in.
If you need a quick counter or your opponent holds a high line, or even if you just have speed on the wings, teaching your keepers to arc their punts – which have a flatter trajectory, spend more time going forward and will run out instead of bounce when the hit the ground – will be of benefit.

As shown above, a basic understanding of foot placement is all which is required to change loft into arc. Loft is achieved by hitting the bottom of the ball with just a bit of forward momentum. Arcing the ball requires hitting it low, but more towards the back of the ball and with more forward momentum. Yes, height allows gravity to help distance but unless you are playing against 10 footers, 10 or 12 feet of height is great to make sure the ball hits going forward for your target player to find on the run.
Set Up
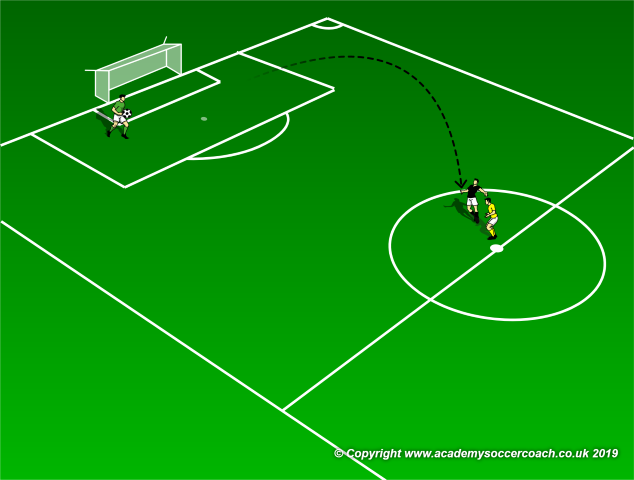
Not being one to over complicate things, to work on this, simply work on it. After the keeper has warmed up, kicking into the net is always a good warm up, have players walk up, pitch the ball to the keeper ( as shown above ) and then turn and go. The coach can designate whether the balls are all arced or all lofted, or allow the chasing players to call it out as they pitch the ball to the keeper. Doing both actually makes a good progression.
Coaching Points
This is a simple concept, but will pay off in games and more importantly, add to the overall development of your keeper. This is especially impactful for those keepers who can already knock it to the moon. Get a bit more forward arc on those and with a speedy forward, those lofted punts can turn from glorified clearances to bona fide counter attacks.
By Mike Smith
Currently the Head Coach for University Heights Academy Boys Soccer in Hopkinsville, KY , Mike is in his 14th year as a high school head coach with 23 years coaching experience overall and 34 year as a student and fan of the game. He holds a USSF D License.

Plyometric Saves
By Mike Smith –
I was first exposed to plyometrics as a training tool in 2000. Simplified as “ jump training” we used plyo work more as a preventative to ankle, knee and hip injuries. I worked primarily as a junior varsity coach at this time and it was my job to develop the next crop of varsity players mostly from those players who wanted to learn soccer but had never played before and were picking it up late in 8th through 10th grade. This work always involved a couple of goal keeper candidates. All of the players, jv and varsity, went through plyometric exercises every day. At some point, when I was struggling to get a young goalie to quicken her feet, she replied to me “ Ohhhh, like we do in the plyo training?” It actually made a big difference for her, perhaps it will help make a difference for your keeper.
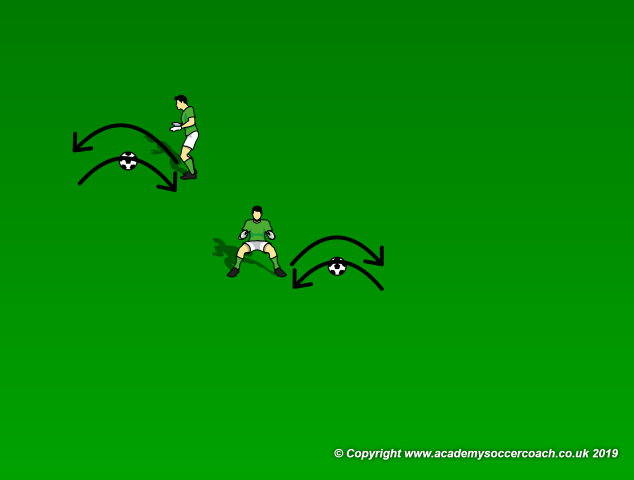
The two plyometric moves ( shown above ) which really help are some of the simplest. From a strictly plyometric stand point, the keeper should always make sure when they land the knees do not come out over the toes and that the legs are straight, meaning the knees should not tilt in ( this is extremely important for female players due to their slightly different hip structure). Keepers should rotate jumping side to side and front to back over a ball focusing on increasing height each time. This can be done for a number of repetitions or seconds in sets of 3 or 5.
There are a couple key factors this type of training helps. When I was going through my D training, the instructor immediately chastened every keeper for leaving their feet too early and going for the “ Hollywood save” as he called it. I have found training by taking an initial jump to the side not only quickens the goalies when immediately leaving their feet ( everyone loves a Hollywood save ) but also helps them react when faking the jump and then going to ground. Likewise, the forward and backward jumps seem to help when making plays going forward or back to the ball during games ( like saving the lob ). Finally, the timing aspect when going for high balls improves when the keepers realize they almost always have time to take a jump before committing to the ball. Here is how to drill it:
Set Up
Two keepers can easily work on this. As shown above, a cone takes the place of the ball used in warm ups. IF the keeper starts behind the cone, they must jump to the front before making the save. Obviously, starting in front means there is a jump to the back before making the save. The same holds true with starting on the left or right sides. Initially, the ball can be thrown between knee and chest high for every progression. However, the keepers can start rolling in balls as well as throwing balls higher as the activity continues. Once they have it, bring on the strikers.
Groups of two strikers step in, the serving striker on a post and the attacking striker 15 – 18 yds out. The ball is served in slightly forward of the shooter, who has two touches including the shot. The keepers rotate between sides on the sideways jumps and between on the line and off for the front and back jumps. There is no cone, but as in both warm ups, the keepers should take a hop before committing to a save.
Coaching Points
The keepers will complain that they miss some saves by hopping and will not readily realize when the hop actually made the save by either increasing their quickness and / or forcing them to read the shot first then commit. The coach should make sure they are making the right read and then as a progression, release the keepers to either hop or not, based on what they see.
By Mike Smith
Currently the Head Coach for University Heights Academy Boys Soccer in Hopkinsville, KY , Mike is in his 14th year as a high school head coach with 23 years coaching experience overall and 34 year as a student and fan of the game. He holds a USSF D License.

The Sweeper Keeper
By Mike Smith –
I wrote a previous tactical based article on the role of the sweeper keeper in support of an aggressive high pressure attack. While this is not usually my preferred style of play, from a keeper training aspect, many of the points of focus in using the “ sweeper keeper” can help improve overall keeper play and in reality, almost every match has those moments where a keeper who was comfortable moving up supporting possession or attack would have prevented some opportunities for the opponent. Here is an exercise to use in giving your goalie the skills needed to “ sweep” and the scenarios in which they will come in handy whether your keeper is a designated “ sweeper keeper” or not.
SWITCHING
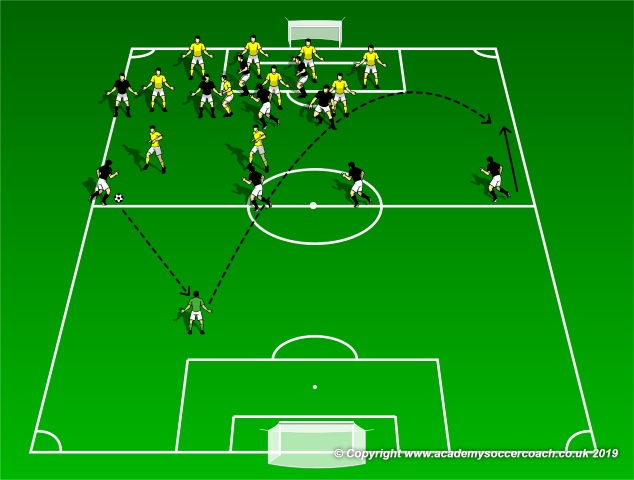
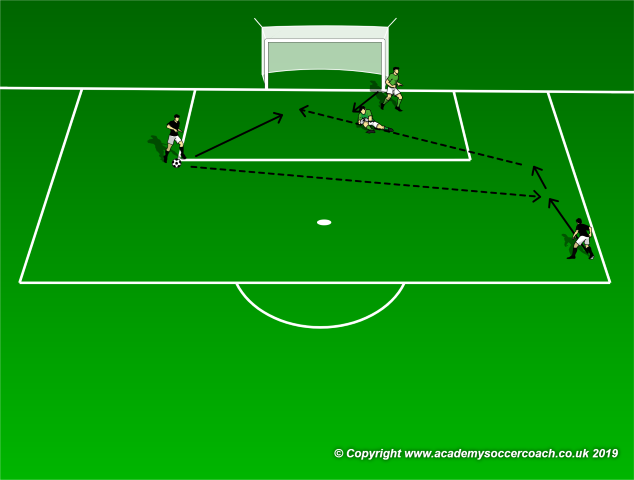
The diagram above shows a common situation where a “ sweeper keeper “ might be used to break down a solid defensive side. Everything is covered and with the traditional switch across the back, a good defensive side is simply going to switch with the ball and the attackers will be looking at the same scenario on the opposite side. Additionally, the wide defender who could be a valid attacking option by switching through the keeper is limited to support with the traditional switch. A good tool to have is to switch off the keeper, who can play cleanly long to the opposite wing in a way which WILL bring the outside back out or allow the switch to be made across the opponents goal via a service – either way a win / win for the attacking team.
In a page right out of Pep Guardiola’s play book, if your keeper is comfortable stepping out off frame to support deep play, your team will always have numbers up. Also, by using the keeper, the center defender is in a more natural situation and can either hold or ( as shown above ) drop back to offer more cover and support. 99 times out of 100 when the keeper steps out, there will be a 4 v 1 ( as shown in red ) out on the line and the keeper can always simply clear it out if things do not develop or the pressure is too high.
An easy way to work on both the keeper stepping up high and switching play, or just stepping out to support possession can be done with one drill.
Set Up
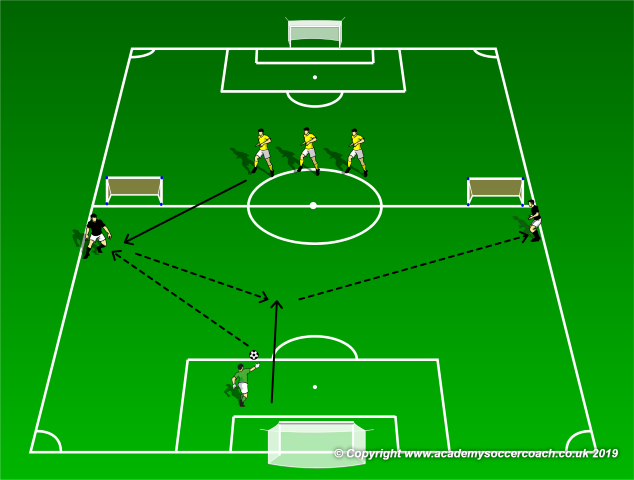
As shown above, set up two pug goals ( cones or sticks can be used ) at each corner of the half line. The keeper and two attackers take on 3 defenders to start. The keeper distributes the ball to a wide attacker and immediately steps up to support the switch. To start the drill, the defenders may not close down until the wide attacker has the ball, but the coach may adjust this to increase pressure as the drill progresses. The keeper must switch the ball to the opposite attacker, who can score on the goal on their side. However, the defenders may step out on this attacker as well. Once the switch is made, it is free play for 10 to 20 seconds, defenders may score on the big goal and the attackers may score on either small goal.
Progression
To work on stepping out off goal to support possession, center up one pug goal, add a defender and 3 attackers and start in a similar fashion, with the goalie out of the box on one side ( as shown above ). Again, the drill starts when the attacker in the 4 v 1 receives the ball from the keeper. The defenders can attempt to win it back and score, but if the keeper stays out for support after making the initial distribution wide, the attacking team should maintain possession.
Coaching Points
While there is a wide outlet, the keepers should resist the urge to force this play across their own goal. Initially if there is trouble, the ball can simply be played out or long up the line. The wide player for the attacking side is simply a decoy anyway and should the ball be hit across the attackers should attempt to shift and set up possession on that side rather than run the wide play right to goal. The idea is to draw out and / or off balance the defense with the extra man the keeper provides.
By Mike Smith
Currently the Head Coach for University Heights Academy Boys Soccer in Hopkinsville, KY , Mike is in his 14th year as a high school head coach with 23 years coaching experience overall and 34 year as a student and fan of the game. He holds a USSF D License.

Effective Goalkeeper Communication
By Mike Smith –
A vocal keeper is a must, however there is a saying in the educational field which I find holds very true in sports as well – “ Just because you can talk, doesn’t mean you can communicate”. One of the first things I usually find myself doing with new teams is explaining to them everyone here knows everyone’s name – which is usually a staple of “ team communication” – several players yelling out the name of the player with the ball. So for keepers, once they have learned to call out marks and bark at their back line to push up – what else can they do to effectively “ communicate” and how can this be worked on?
I have had success breaking this down into 3 categories and working on these 3 scenarios in basic defense vs offense half field drills. The 3 categories are 1. Supporting Communication 2. Instructional Communication and 3. Informative Communication. Most of us cover the instructional aspects but neglect the importance of supportive and informative communication, especially at the youth levels. Take these situations for example:
In the diagram below we see a very common defensive scenario. It is also a scenario in which the outside back, ( shaded in red ) is being set up for failure. The outside back has waited too long to close down the wide attacker and is in a “catch 22”. Step out now and a simple one two has the keeper facing a shot. Hold the line and a well hit service or run to the end line will open up a shooter. This is where Supporting Communication could have helped. Why didn’t the outside back close this down earlier?
I see this too much and then the keeper will often times get on the back in a negative manner after the fact. I do not allow my players to do this. I always tell them “ The only player I want being negative after the fact is the one who owns a time machine.” Put that effort into encouraging and supporting each other EARLY. A keeper should absolutely encourage early pressure when their back line is numbers up ( as shown below). This confidence and positive support will transfer across the pitch and besides, if your back gets beat at midfield, they still have a lot of room and time to recover. The keeper should have been more proactive and “ supporting here”.
Here is an example of when a keeper should use informative communication, i.e., let the defenders know what THEY are doing.
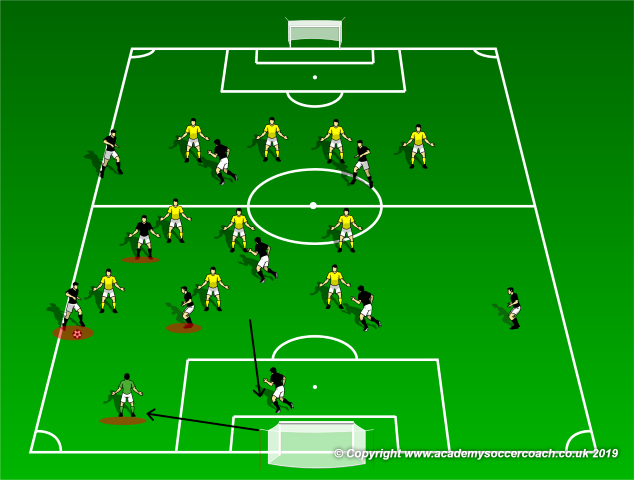
Above we see a keeper faced with what to do with either a crossing service or a near post attack. IF the keeper goes out to shut down the angle or up to intercept the cross, the back post / line will need to be covered. IF the keeper is going to hold their line, the defenders should continue to mark tight. Even though this happens fast, the keeper is the only player who knows what they are going to do. Seconds count. Even if the keeper simply yells “ GOING OUT, or GOING UP “ as they start to move, this could be enough time for the defenders to get in better defensive position instead of getting beaten by a run AND a pass.
Working on this stuff at practice is fairly straight forward and as a bonus, really fun for the keeper and the team. First, set up as shown below for the keeper to work on supporting communication:
Groups of 4 defenders take on groups of 3 attackers on a half field. Play starts as shown ( above ) with a keeper distribution to a wide attacker. The idea is for the keeper to encourage the outside back to close down aggressively, and the rest of the defenders to shift up and over in support – hoping to steal a square pass to the opposite outside attacker. It is all positive, all aggressive here. IF the defender gets beaten, more encouragement to get back and recover is the focus ( as shown below ).

Again, simple enough, almost simple enough not to work on but I promise a few of these sessions, if for no other reason than letting off the pressure of allowing goals and letting the defenders be more aggressive, will improve the overall positive communication of the whole squad.
Informative communication is much the same:

Set up as shown above, 4 attackers vs 4 defenders. Play starts with the keeper sending the ball out to the wide attacker, who must serve the ball within 2 seconds and cannot come in to finish until the ball is across the goal. The goalie MUST yell out what they are doing before or as they start to make a play on the ball. IF the keeper comes out or up – a defender must at least drop off and guard the line on the back post. Just like the first drill, this is all about the keeper being decisive AND communicating that decision to his defenders.
Coaching Points
By adding supporting and informative communication to the standard instructional communication, a keeper will enhance their communication and leadership skills while building a more positive cohesive defending unit. The coach should encourage this by making sure everything happening in this session is positive and proactive, unless you are that person I have been looking for who has the time machine.
By Mike Smith
Currently the Head Coach for University Heights Academy Boys Soccer in Hopkinsville, KY , Mike is in his 14th year as a high school head coach with 23 years coaching experience overall and 34 year as a student and fan of the game. He holds a USSF D License.